Seamless Integration: A Practical Guide to Jenkins CI/CD for Django Development


Table of contents
- What is CI/CD?
- What is a pipeline?
- Let's Start
- Step 1 : Setting up a EC2 instance
- Step 2: Connect with the instance.
- Step 3: Installing Jenkins
- Step 4: Django Project Setup
- Step 5: Starting Jenkins
- Step 6: Adding env setup file
- Step 7: Adding Jenkinsfile
- Adding gunicorn setup file
- Step 8: Reverse Proxy(Nginx) Setup
- Step 9: Configuring The Pipeline
- Step 10: Giving access to Jenkin User
- Step 11: Refactoring the code
- Step 12: Accessing The Project on Browser.
- Bonus Tips
- Conclusion
In this article, I am going to explain you through the process of combining Django and Jenkins for a smooth CI/CD pipeline in your Python web projects. If you're already familiar with the basics of CI/CD and pipelines, feel free to skip and you can jump to the steps. For those just diving in, I'll briefly cover the essentials before we get into the hands-on steps
What is CI/CD?
CI/CD stands for Continuous Integration and Continuous Deployment (or Continuous Delivery), and it represents a set of best practices, principles, and automated processes aimed at improving the software development and delivery lifecycle.
Yeah, but what is this and why should we use it?
Continuous Integration (CI): Imagine a team of developers working on a mobile app. Each developer is responsible for adding new features or fixing bugs. In a CI setup, every time a developer finishes their work on a particular feature or bug fix, they integrate their code changes into a shared code repository, let's say on GitHub. Automated tests are then triggered to ensure that the new code doesn't break the existing functionality. If any issues are found, the team is notified immediately, allowing them to fix the problems early in the development process.
Continuous Deployment (CD): Now, consider the same mobile app project, but this time with continuous deployment. Once the code changes pass all the automated tests in the CI phase, the updated app is automatically deployed to a staging environment or even directly to production. Users can start using the new features or bug fixes almost immediately. This rapid deployment ensures that the latest improvements are available to users as soon as they are deemed stable and functional.
Continuous Delivery (CD): In a continuous delivery scenario, the process is similar to continuous deployment, but with an additional manual step before deploying to the production environment. After passing automated tests in the CI phase, the updated app is deployed to a staging environment. A team member or a designated person then reviews the changes and decides when to manually trigger the deployment to the production environment. This adds a layer of human oversight before changes go live.
What is a pipeline?
A pipeline refers to a set of automated processes and steps through which software code progresses from development to deployment. This sequence of steps is known as a "pipeline" because it represents a flow of activities, typically organized in a linear or branching structure. The purpose of a pipeline is to automate and streamline the software delivery process, making it more efficient, consistent, and reliable.
Let's consider a simplified example of a continuous integration and deployment (CI/CD) pipeline for a web application using a hypothetical e-commerce project.
Source Code Repository:
- Developers collaborate on the project and store the source code in a version control repository, such as Git on GitHub.
Continuous Integration (CI) Pipeline:
When a developer pushes changes to the repository, it triggers the CI pipeline.
The CI pipeline consists of the following stages and tasks:
Build Stage:
- Compiles the source code into executable binaries.
Test Stage:
- Runs automated tests to ensure that the new code changes haven't introduced regressions or errors.
Code Quality Stage:
- Checks for coding standards, code complexity, and other code quality metrics.
Artifact Generation:
- Creates deployable artifacts, such as a packaged web application.
Continuous Deployment (CD) Pipeline:
If all the tasks in the CI pipeline are successful, it triggers the CD pipeline.
The CD pipeline consists of the following stages and tasks:
Deploy to Staging:
Takes the artifacts from the CI pipeline and deploys them to a staging environment.
Automated tests are run in the staging environment to verify the application's behavior in a production-like setting.
Manual Approval:
- A manual approval step where a team member reviews the changes in the staging environment and decides whether to proceed with deployment to production.
Deploy to Production:
If the manual approval is granted, the artifacts are deployed to the production environment.
The application is now live for end-users.
Rollback Mechanism:
The pipeline includes a rollback mechanism in case issues are discovered in the production environment after deployment.
If a problem occurs, the team can trigger a rollback to the previous version of the application.
Monitoring and Logging:
Throughout the pipeline, monitoring and logging tools are used to track the progress of each stage and capture any issues or anomalies.
Metrics related to application performance, errors, and resource utilization are monitored in both staging and production environments.
Automation Tool:
- Jenkins, a popular CI/CD automation tool, is used to define and execute the pipeline stages and tasks.
In this example, the CI/CD pipeline automates the process from code changes to deployment, ensuring that the application is built, tested, and deployed consistently. The staging environment acts as a testing ground before changes are applied to the production environment, and the pipeline includes mechanisms for both manual approval and rollback to maintain control and reliability.
So Now we understand the basic let's get started with step by step on how to setup the ci/cd pipeline with Jenkins.
Let's Start
For the first step, you need to choose a machine; you can either use your own machine or any virtual server for hosting your application and building the pipeline. Since I want it to be real, I am going with an EC2 instance (an AWS service).
Step 1 : Setting up a EC2 instance
Setting up an ec2 instance is pretty straight forward.
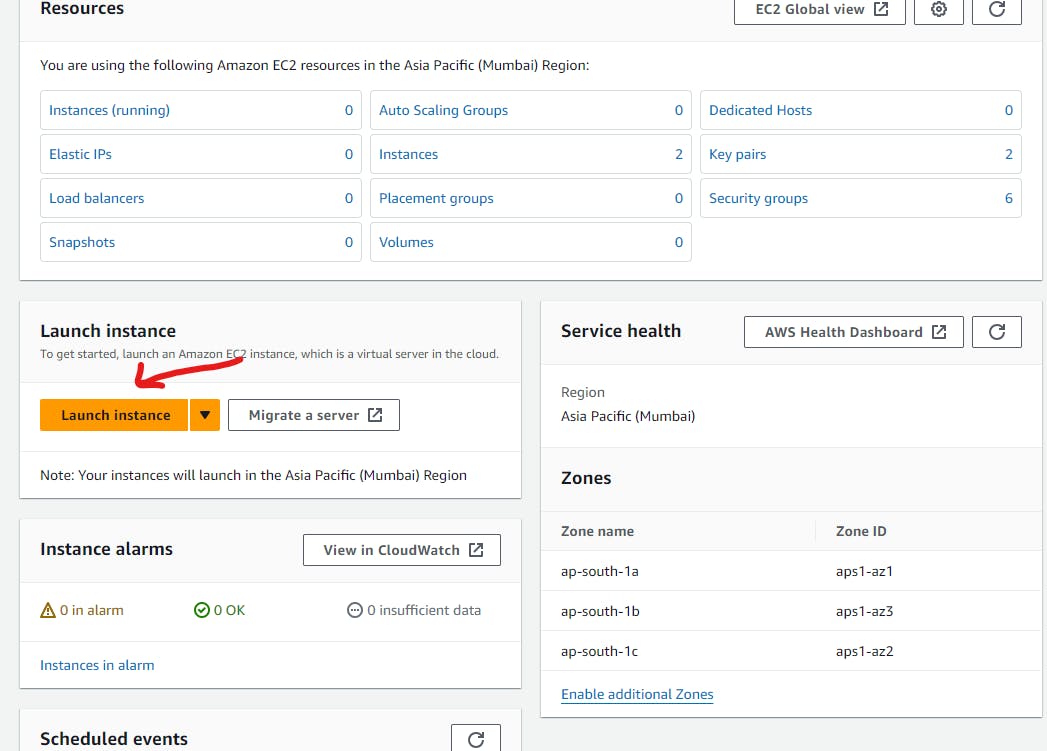
Go to AWS console AWS Amazon and sign in with your account.
Go to EC2 and click on launch instance.
Now give a name, select your machine type, create or select a key pair(for SSH login), rest you can select according to your project infrastructure or use default settings. (I used free tier ubuntu)

Launch the instance and wait for some minutes to boot up the server.
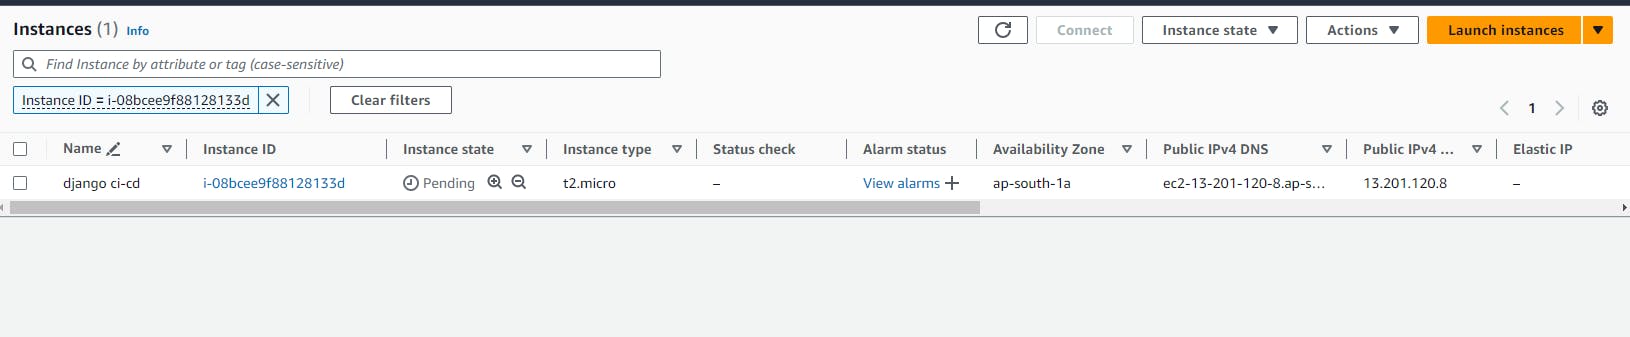
Great! Instance is successfully created, we completed the first step.
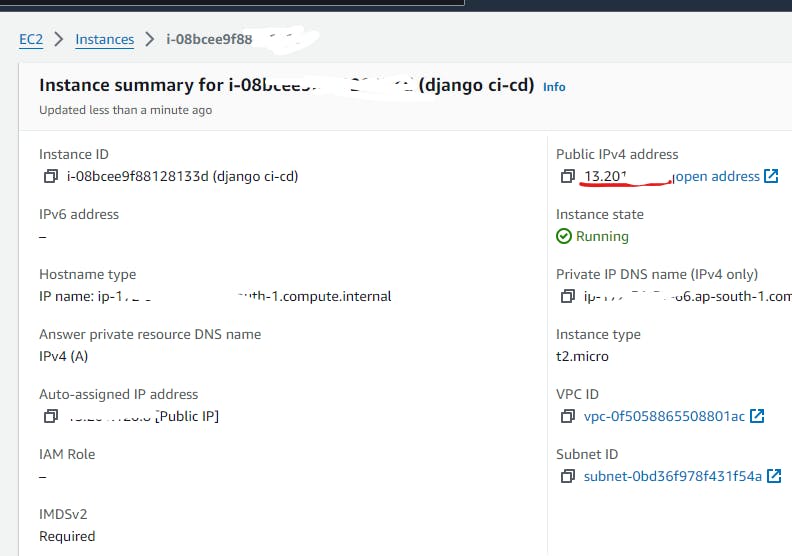
Step 2: Connect with the instance.
Connect with ec2 instance is also a very easy step. We going to connect with our server using ssh keys.
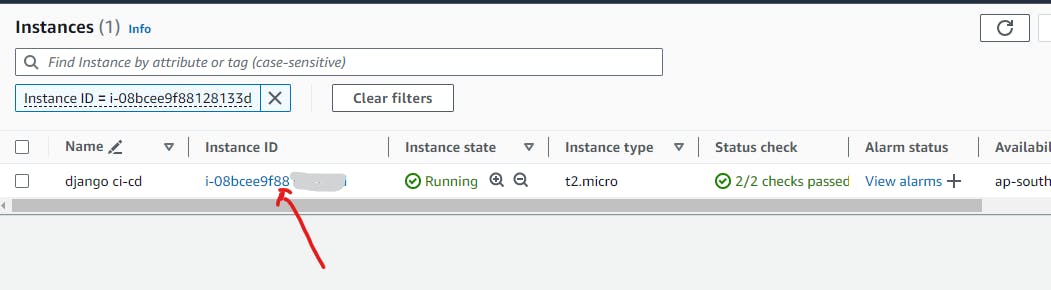
Just click on the instance id.
Click on connect on the upper-right.
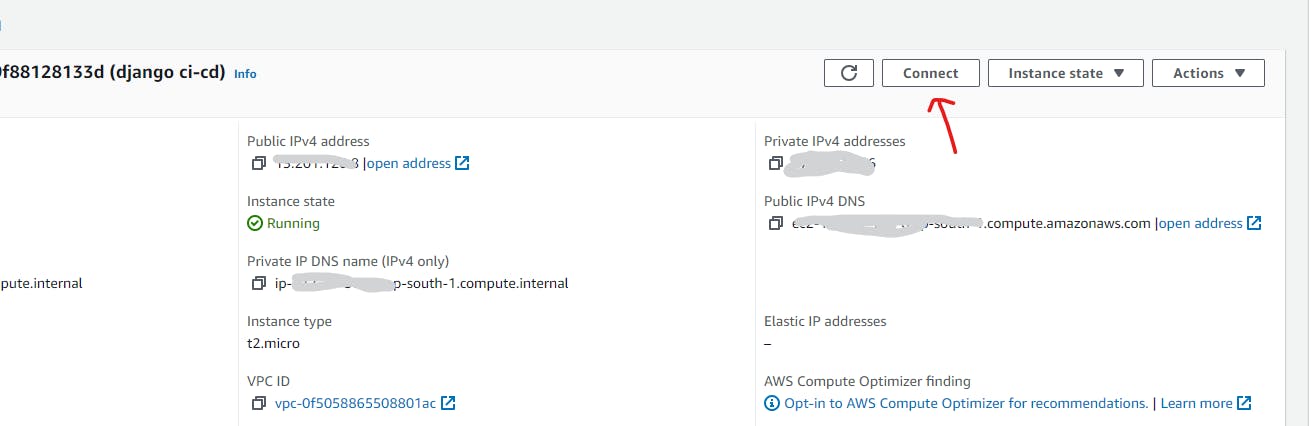
Go to the SSH client, where there are clear instructions on how to connect through SSH to the instance.
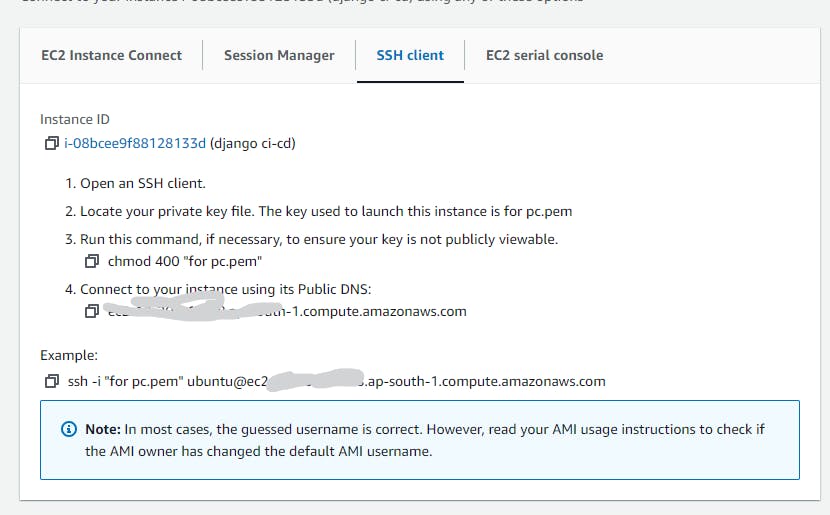
Now after giving the permission to our key pair and running the command, we will be connected to our instance, like this.
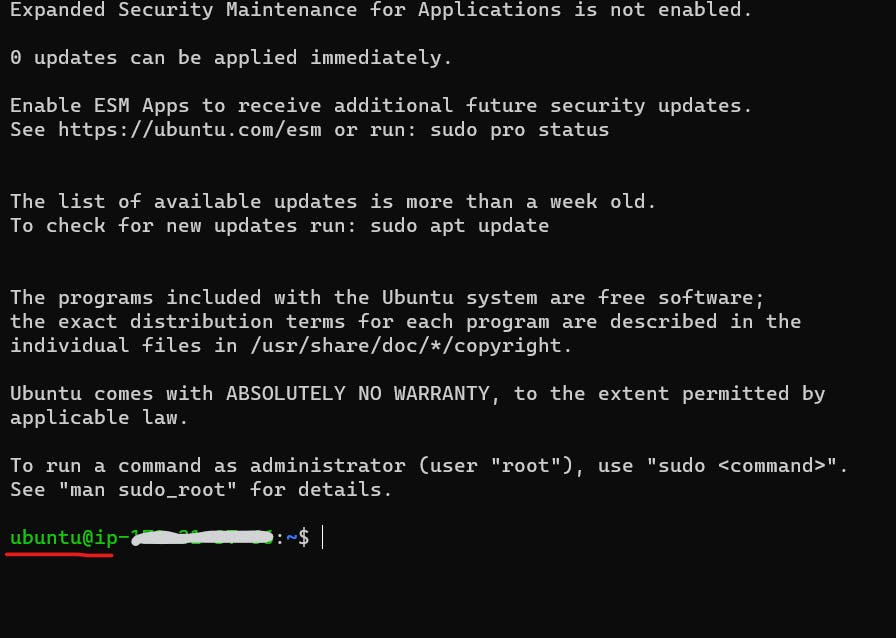
Great! Step 2 is done.
Step 3: Installing Jenkins
For installing Jenkins on our ec2 instance, java is necessary because Jenkins is built using Java and runs as a Java application.
Updating and Upgrading the system.(will take some time Approx.: 2-3 min)
sudo apt-get update -yRunning
sudo apt-get updateon a fresh EC2 Linux instance is a best practice to ensure that your package manager has the latest information about available software packages.sudo apt-get upgrade -ysudo apt-get upgradeis used to install the latest versions of all packages currently installed on the system. It does not install new packages; instead, it upgrades the existing ones to their latest versions.Java Installation
sudo apt-get install openjdk-17-jre -yI am installing open-jdk version 17 as it is the latest. You may use different one according to when you are reading this article. For checking support policy for Jenkins Visit Support Policy Java Jenkins .
Jenkins Installation
 sudo wget -O /usr/share/keyrings/jenkins-keyring.asc \
   https://pkg.jenkins.io/debian-stable/jenkins.io-2023.key
echo deb [signed-by=/usr/share/keyrings/jenkins-keyring.asc] \ https://pkg.jenkins.io/debian-stable binary/ | sudo tee \ /etc/apt/sources.list.d/jenkins.list > /dev/nullsudo apt-get update -ysudo apt-get install jenkins -yRun these 4 command one by one
ORcreate a script called install_jenkins.sh
Add the following content
 #!/bin/bash

 sudo wget -O /usr/share/keyrings/jenkins-keyring.asc \
   https://pkg.jenkins.io/debian-stable/jenkins.io-2023.key

 echo deb [signed-by=/usr/share/keyrings/jenkins-keyring.asc] \
   https://pkg.jenkins.io/debian-stable binary/ | sudo tee \
   /etc/apt/sources.list.d/jenkins.list > /dev/null

 sudo apt-get update
 sudo apt-get install jenkins
Make the script executable:
chmod +x install_jenkins.shRun the Script:
./install_jenkins.shThis will run all four commands sequentially.
Visit Jenkins Installation Linux for more info.
Jenkins has been successfully installed.
Step 4: Django Project Setup
Create a virtual env for your project in your local machine or wherever you primarily storing the code like GitHub or Bitbucket etc.
python3 -m venv envActivate it
 source env/bin/activate
 # OR
 env/Scripts/activate
Create a requirements.txt file
 django
 gunicorn
Add all the dependencies in it which is required to run your project for eg: if you using API, add djangorestframework , pillow (if your models have image field or file field ) etc.
Install the requirements in your virtual environment (Optional: if you want to run your project locally)
pip install -r requirements.txtcheck the installed package by
pip freezeAdd .gitignore
 env
 .idea
 # Byte-compiled / optimized / DLL files
 __pycache__/
 *.py[cod]
 *$py.class
Note : Don't forget to add .env file or any file which is storing any kind of DB config or API keys.
Step 5: Starting Jenkins
Our Jenkins is installed in the server, and let's start it.
Starting the Jenkins server
sudo systemctl daemon-reloadsudo systemctl start jenkinssudo systemctl status jenkins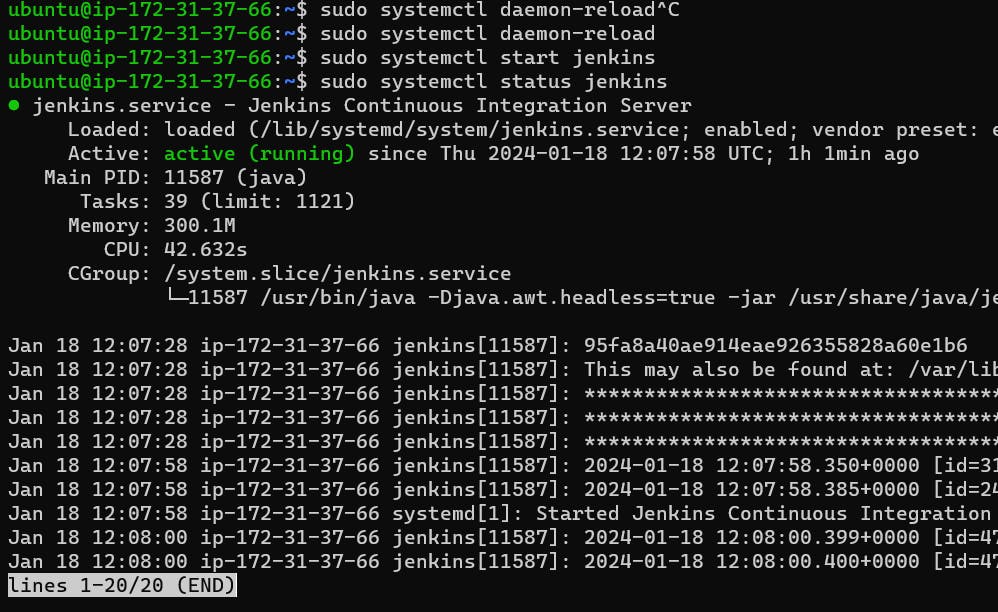
Accessing the Jenkins through browser
Jenkins uses port 8080 for web access. When you install Jenkins and start the Jenkins server, it will listen on port 8080 for incoming HTTP requests.
By default, Jenkins uses 8080
For accessing Jenkins on the browser, copy your machine Ip address, in our case we are using ec2 instance so we need to give the permission to expose the port (and if you are doing this on your local machine you can skip this process), so copy the address and go to this url.
http://your-server-ip:8080
or if using local machine
http://localhost:8080
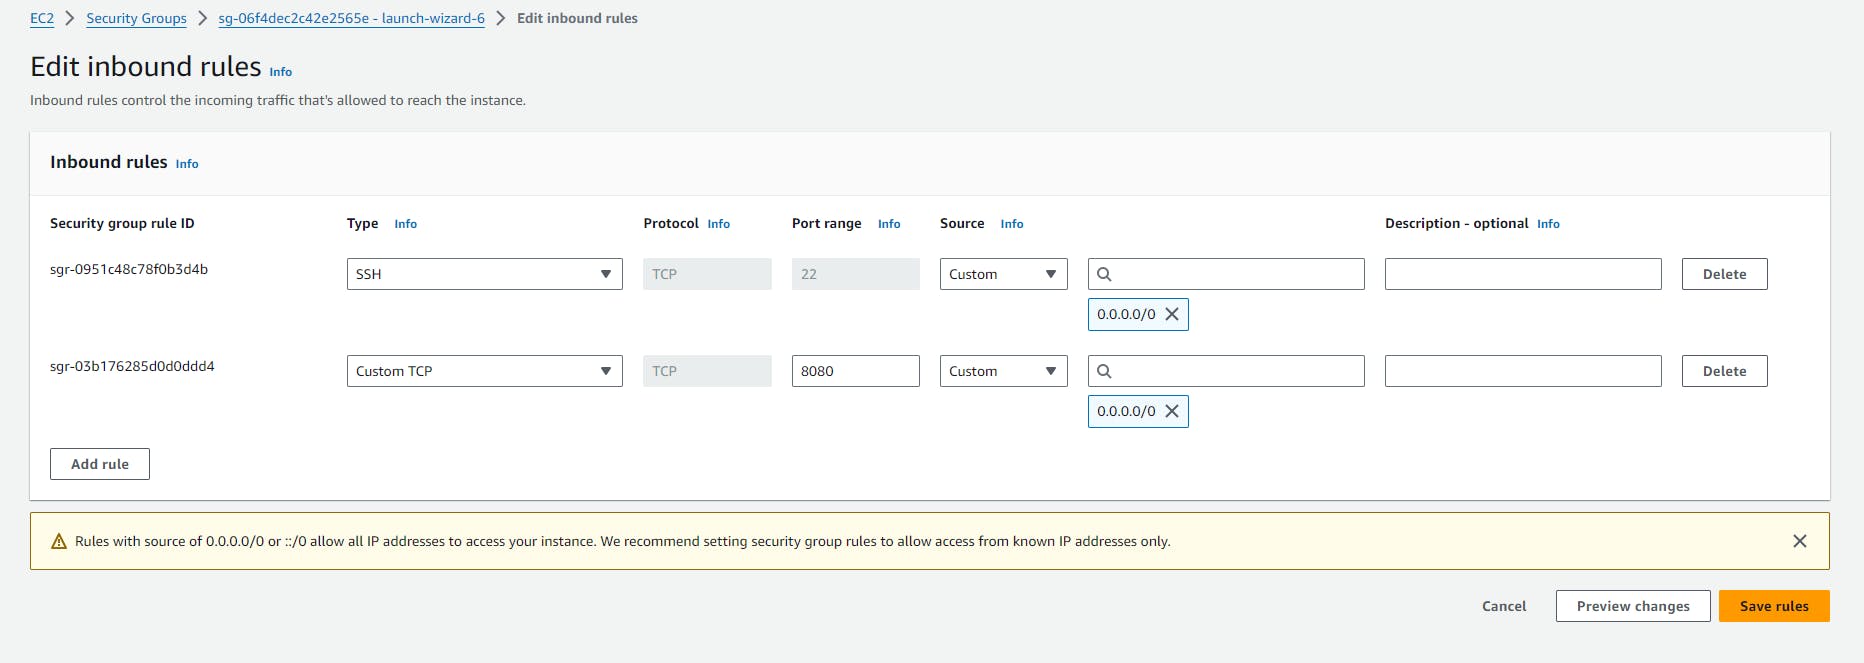
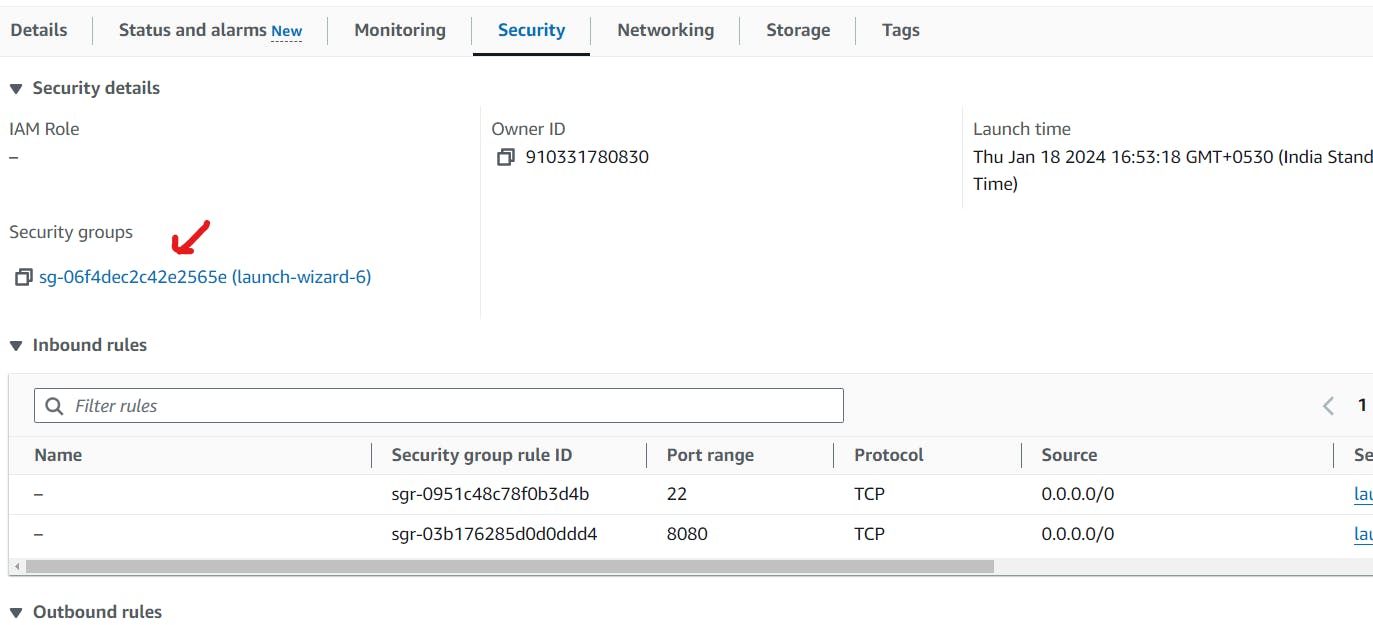
In our case, the security is not setup for port 8080. let's set it up in aws console.
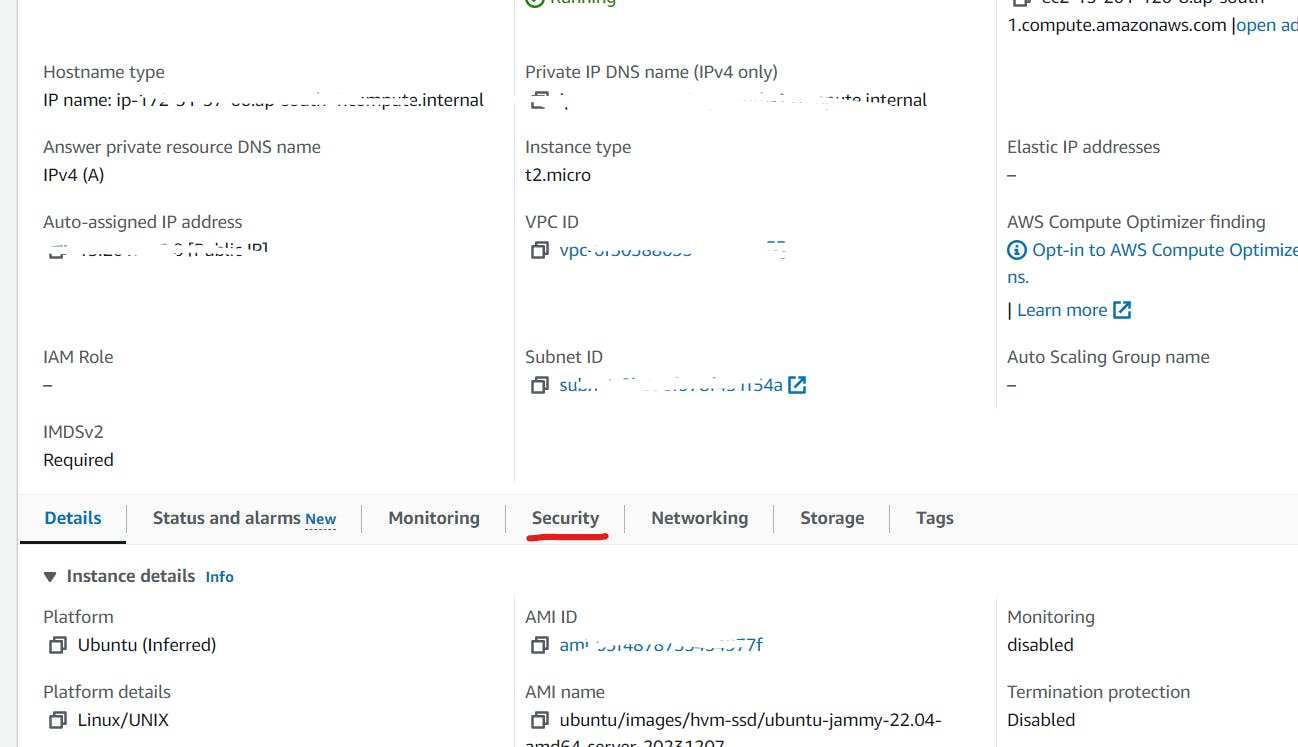
Go to security tab.
Add the rule for 8080 like this
Now try to access the URL.
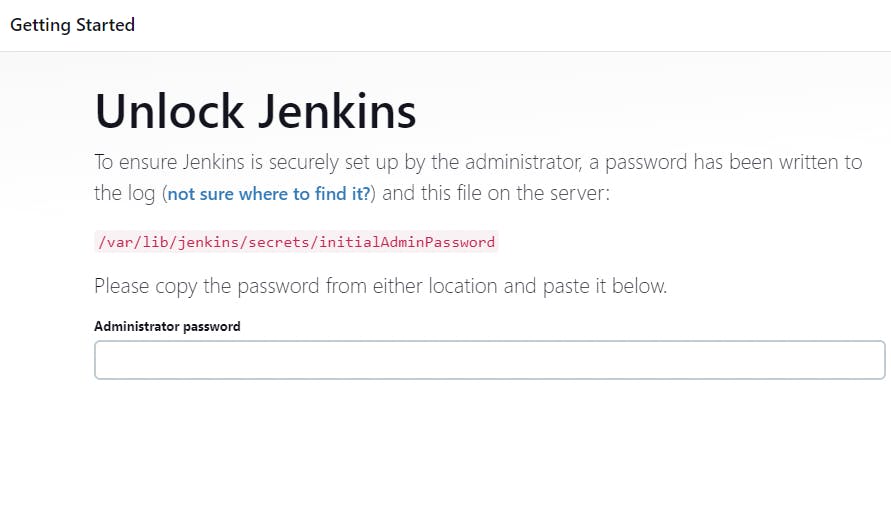
Unlocking the Jenkins
sudo cat /var/lib/jenkins/secrets/initialAdminPassword
copy the password and enter it.
And select Install Suggested Plugins

Looks like the installation is successful.
Step 6: Adding env setup file
Let's make the environment setup file to setup the virtual environment and logs.
Make a file called envsetup.sh
#!/bin/bash

# Check if virtualenv is installed
if command -v virtualenv &> /dev/null; then
    echo "virtualenv is already installed."
else
    echo "Installing virtualenv......"
    sudo apt install -y python3-virtualenv
fi


if [ -d "env" ]
then
    echo "Python virtual environment exists."
else
    echo "Creating a virtual environment"
    virtualenv env
fi

echo "The current directory"
echo $PWD
echo -e "\n\n\n"

echo "Activating the virtual environment"
source env/bin/activate
echo -e "\n\n\n"


# Check if pip3 is installed
echo "Checking for pip3 installation"
if command -v pip3 &> /dev/null; then
    echo "pip3 is already installed."
else
    echo "Installing pip3......."
    sudo apt install -y python3-pip
fi

echo -e "\n\n\n"
echo "Installing Requirements...."
pip3 install -r requirements.txt
echo "Requirements Installed."
echo -e "\n\n\n"

echo "Checking for logs"
if [ -d "logs" ]
then
    echo "Log folder exists."
else
    echo "Creating Logs"
    mkdir logs
    touch logs/error.log logs/access.log
fi

echo -e "\n\n\n"
echo "Giving Permission"
sudo chmod -R 777 logs
echo -e "\n\n\n"
echo "*********Script Ended************"
File Hierarchy
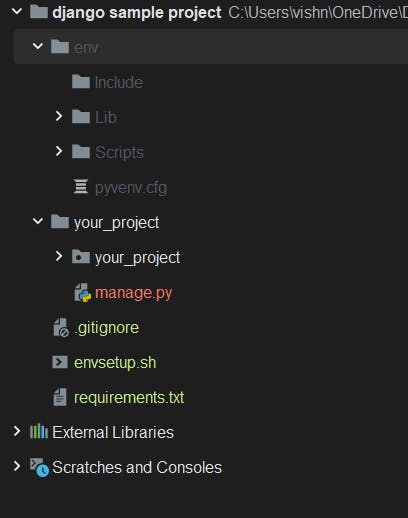
Let me explain what we did inside this file
- Check for the existence of a Python virtual environment (
env):
Checks if the directory named "env" (presumably a Python virtual environment) exists.
If it exists, prints a message stating that the virtual environment exists.
If it doesn't exist, creates a Python virtual environment using
python3 -m venv env.
Activate the Python virtual environment:
- Activates the virtual environment using
source env/bin/activate.
- Activates the virtual environment using
Install Python dependencies from
requirements.txt:- Uses
pip3to install the dependencies listed in therequirements.txtfile.
- Uses
Set permissions for the "logs" folder:
Changes the permissions of the "logs" folder and its contents to allow read, write, and execute permissions for everyone (
chmod -R 777 logs).Note: Using
chmod 777provides full read, write, and execute permissions to everyone, which may have security implications
Feel free to change any of the code according to your convenience.
Step 7: Adding Jenkinsfile
Now create a file named "Jenkinsfile".
What is Jenkinsfile?
A Jenkinsfile is a text file that defines the steps or stages of a Jenkins Pipeline. A Jenkins Pipeline is a suite of plugins that supports implementing and integrating continuous delivery pipelines into Jenkins.
Let's create a pipeline, create a file named Jenkinsfile
pipeline{
    agent any
    stages {

        stage('Setup Python Virtual ENV for dependencies'){

      steps  {
            sh '''
            chmod +x envsetup.sh
            ./envsetup.sh
            '''}
        }
        stage('Setup Gunicorn Setup'){
            steps {
                sh '''
                chmod +x gunicorn.sh
                ./gunicorn.sh
                '''
            }
        }
        stage('setup NGINX'){
            steps {
                sh '''
                chmod +x nginx.sh
                ./nginx.sh
                '''
            }
        }
    }
}
Note: We will add gunicorn.sh and nginx.sh file later. Also I will explain why to use Nginx and Gunicorn.
Adding gunicorn setup file
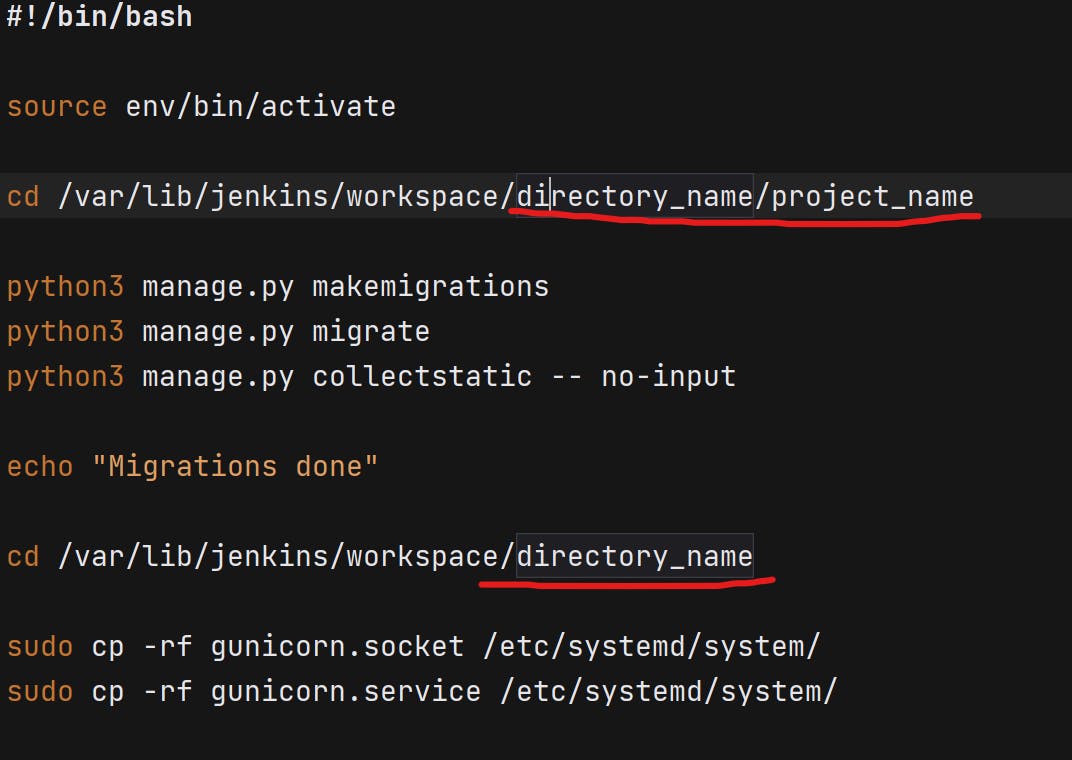
Create a file name as "gunicorn.sh"
What is gunicorn?
Gunicorn (Green Unicorn) is a WSGI (Web Server Gateway Interface) server for running Python web applications.
Imagine you have a Python web application, like a website built with a framework such as Flask or Django. Now, when someone wants to visit your website, their browser sends a request to your server, asking for the webpage. Here's where Gunicorn comes into play:
Gunicorn acts like a traffic cop for your website. It takes the incoming requests from users and directs them to the appropriate part of your Python web application.
Gunicorn is good at handling many requests at the same time. It's like having multiple waiters at a restaurant. While one waiter takes an order, others can serve food to different tables, making the overall service faster.
Production WSGI servers are designed to handle multiple requests concurrently, making them suitable for scaling in a production environment. Django's development server is single-threaded and not optimized for handling a large number of simultaneous requests.
It handles incoming requests, manages many requests at once, and ensures smooth updates or restarts. It's the waiter that takes orders (requests) and ensures the chef (your web app) serves the food (webpages) efficiently, even when the restaurant (your website) is busy.
#!/bin/bash

source env/bin/activate

cd /var/lib/jenkins/workspace/directory_name/project_name

python3 manage.py makemigrations
python3 manage.py migrate
python3 manage.py collectstatic -- no-input

echo "Migrations done"

cd /var/lib/jenkins/workspace/directory_name

sudo cp -rf gunicorn.socket /etc/systemd/system/
sudo cp -rf gunicorn.service /etc/systemd/system/

echo "$USER"
echo "$PWD"


sudo systemctl daemon-reload
sudo systemctl start gunicorn

echo "Gunicorn has started."

sudo systemctl enable gunicorn

echo "Gunicorn has been enabled."

sudo systemctl restart gunicorn


sudo systemctl status gunicorn
Now let's add the gunicorn.socket and gunicorn.service file.
gunicorn.socket
[Unit]
Description=gunicorn socket

[Socket]
ListenStream=/run/gunicorn.sock
# Our service won't need permissions for the socket, since it
# inherits the file descriptor by socket activation
# only the nginx daemon will need access to the socket
SocketUser=www-data
# Optionally restrict the socket permissions even more.
# SocketMode=600

[Install]
WantedBy=sockets.target
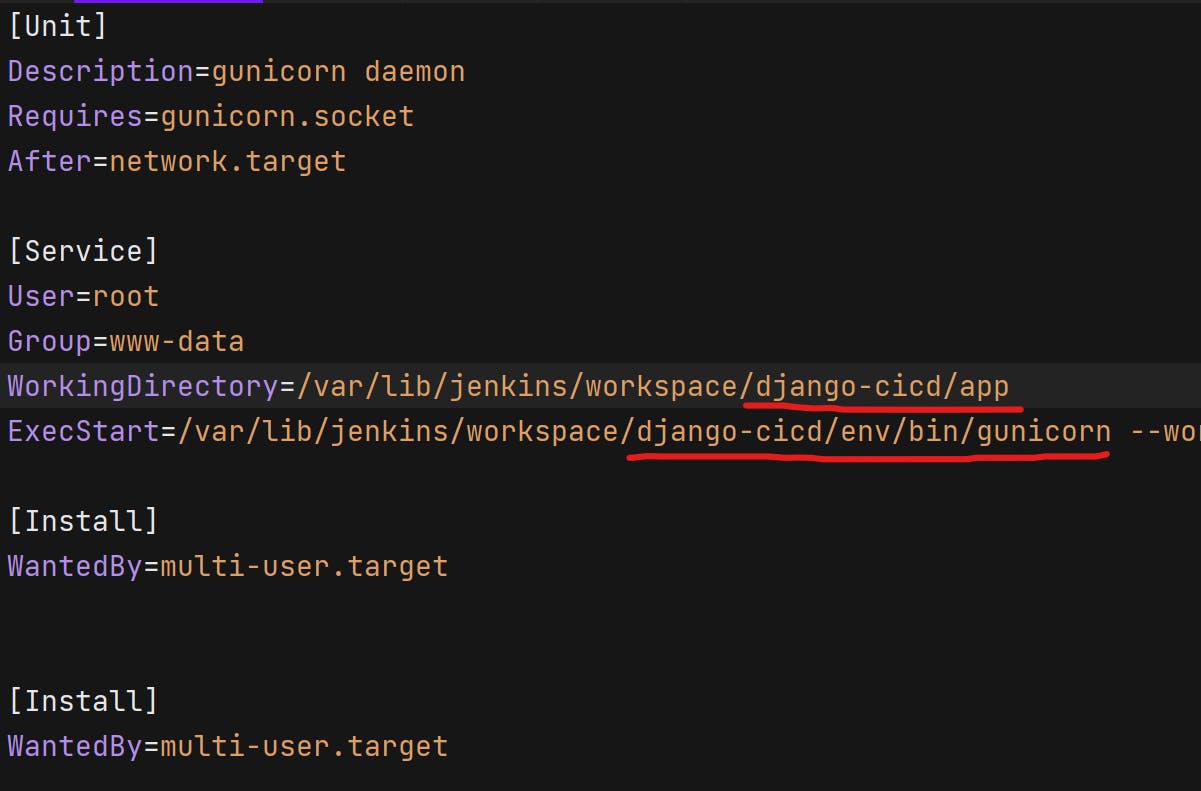
gunicorn.service
[Unit]
Description=gunicorn daemon
Requires=gunicorn.socket
After=network.target

[Service]
User=root
Group=www-data
WorkingDirectory=/var/lib/jenkins/workspace/django-cicd/app
ExecStart=/var/lib/jenkins/workspace/django-cicd/env/bin/gunicorn
           --workers 1
           --log-level debug
           --error-logfile /var/lib/jenkins/workspace/django-cicd/error.log
           --bind unix:/run/gunicorn.sock app.wsgi:application

[Install]
WantedBy=multi-user.target


[Install]
WantedBy=multi-user.target
Change the paths according to your project structure. Don't worry i will tell how to know the path and all later. You can continue without updating the path.
Step 8: Reverse Proxy(Nginx) Setup
Now let's setup nginx as our reverse proxy but for those who don't know
What is Nginx and Why we are using?
Nginx is a popular open-source web server and reverse proxy server that is widely used for hosting websites and applications. It is known for its high performance, stability, and scalability.
When using Django in a production environment, it's common to deploy it behind a combination of Nginx and Gunicorn. Here's why this combination is popular:
Nginx as a Reverse Proxy: Nginx can serve as a reverse proxy, handling client requests and forwarding them to Gunicorn. This allows Nginx to handle tasks like SSL termination, static file serving, and load balancing. Nginx is particularly efficient at serving static files, so offloading this task from Gunicorn can improve overall performance.
Handling Static Files: Django is a powerful web framework, but it may not be as efficient as dedicated web servers like Nginx at serving static files (e.g., images, stylesheets, JavaScript). By using Nginx to serve static content, Gunicorn can focus on handling dynamic content and application logic.
Nginx is configured to act as a reverse proxy for your Django application served by Gunicorn. It handles static files, forwards dynamic requests to Gunicorn, and provides additional features like load balancing and security
Now let's back to work.
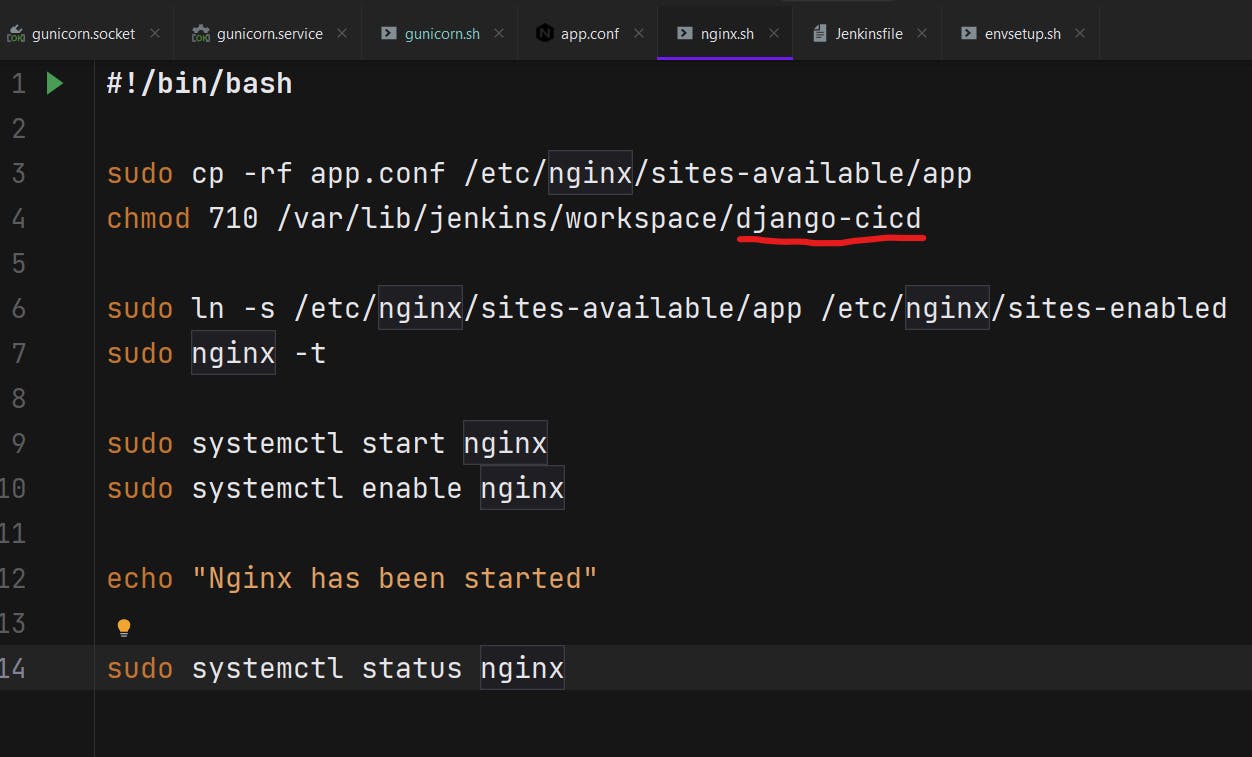
Create a file named "nginx.sh".
#!/bin/bash

sudo cp -rf app.conf /etc/nginx/sites-available/app
chmod 710 /var/lib/jenkins/workspace/django-cicd

sudo ln -s /etc/nginx/sites-available/app /etc/nginx/sites-enabled
sudo nginx -t

sudo systemctl start nginx
sudo systemctl enable nginx

echo "Nginx has been started"

sudo systemctl status nginx
Now create an app.conf file
server {
  listen 80;
  server_name IP;
  error_log /var/lib/jenkins/workspace/django-cicd/logs/error.log;
  access_log /var/lib/jenkins/workspace/django-cicd/logs/access.log;

  location = /favicon.ico { access_log off; log_not_found off; }

  location /static/ {
    root /var/lib/jenkins/workspace/django-cicd;
  }

  location / {
    proxy_set_header Host $host;
    proxy_set_header X-Real-IP $remote_addr;
    proxy_set_header X-Forwarded-For $proxy_add_x_forwarded_for;
    proxy_set_header X-Forwarded-Proto $scheme;
    proxy_pass http://unix:/run/gunicorn.sock;
    }
}
change the ip with the ec2 instance ip.
Installing NGINX
sudo apt-get install nginx
sudo systemctl start nginx
sudo systemctl enable nginx
sudo systemctl status nginx
Now if status is active it means, it is setup properly.
Step 9: Configuring The Pipeline
The Jenkins is already installed and unlocked, so let's get started with creating our first Admin User.
Access Jenkins through browser.
Fill the form

Configure the URL(am using as it is.)

Click on Start using Jenkins.
Now you will be on dashboard.
Now upload your project on any VCS like GitHub or Bitbucket. And now we are good to go with configuring our first pipeline for the project.
Go to the dashboard.
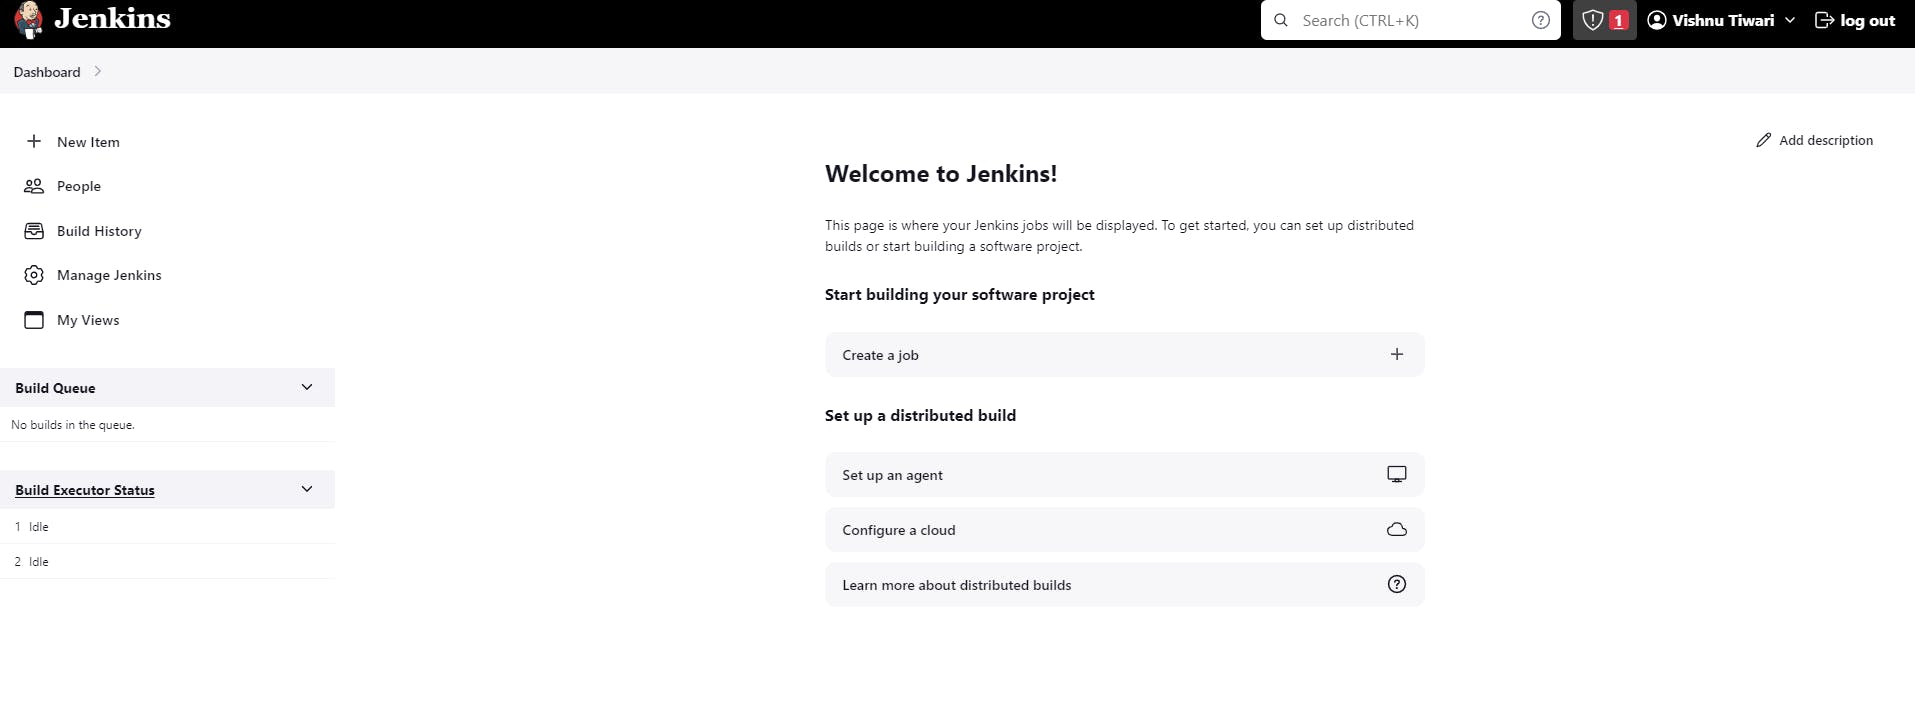
Click on New Item.
Enter the name of your project and click on pipeline.

Now In General section, give a meaningful description and use option Discard Old Builds.

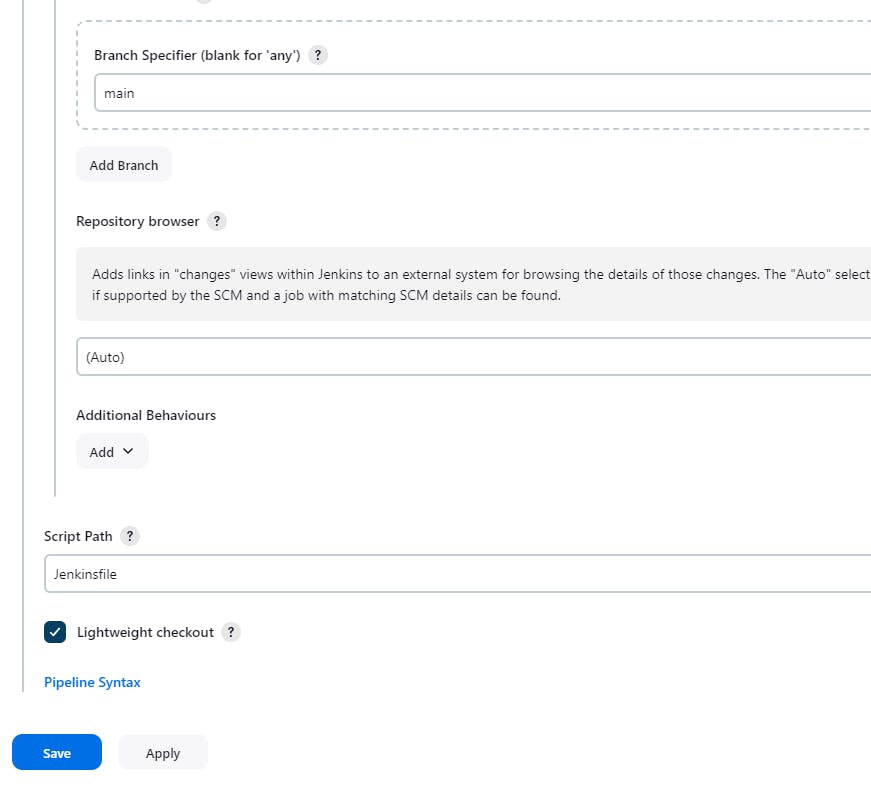
You can leave it everything as it is and go to Pipeline.
Give information like this.
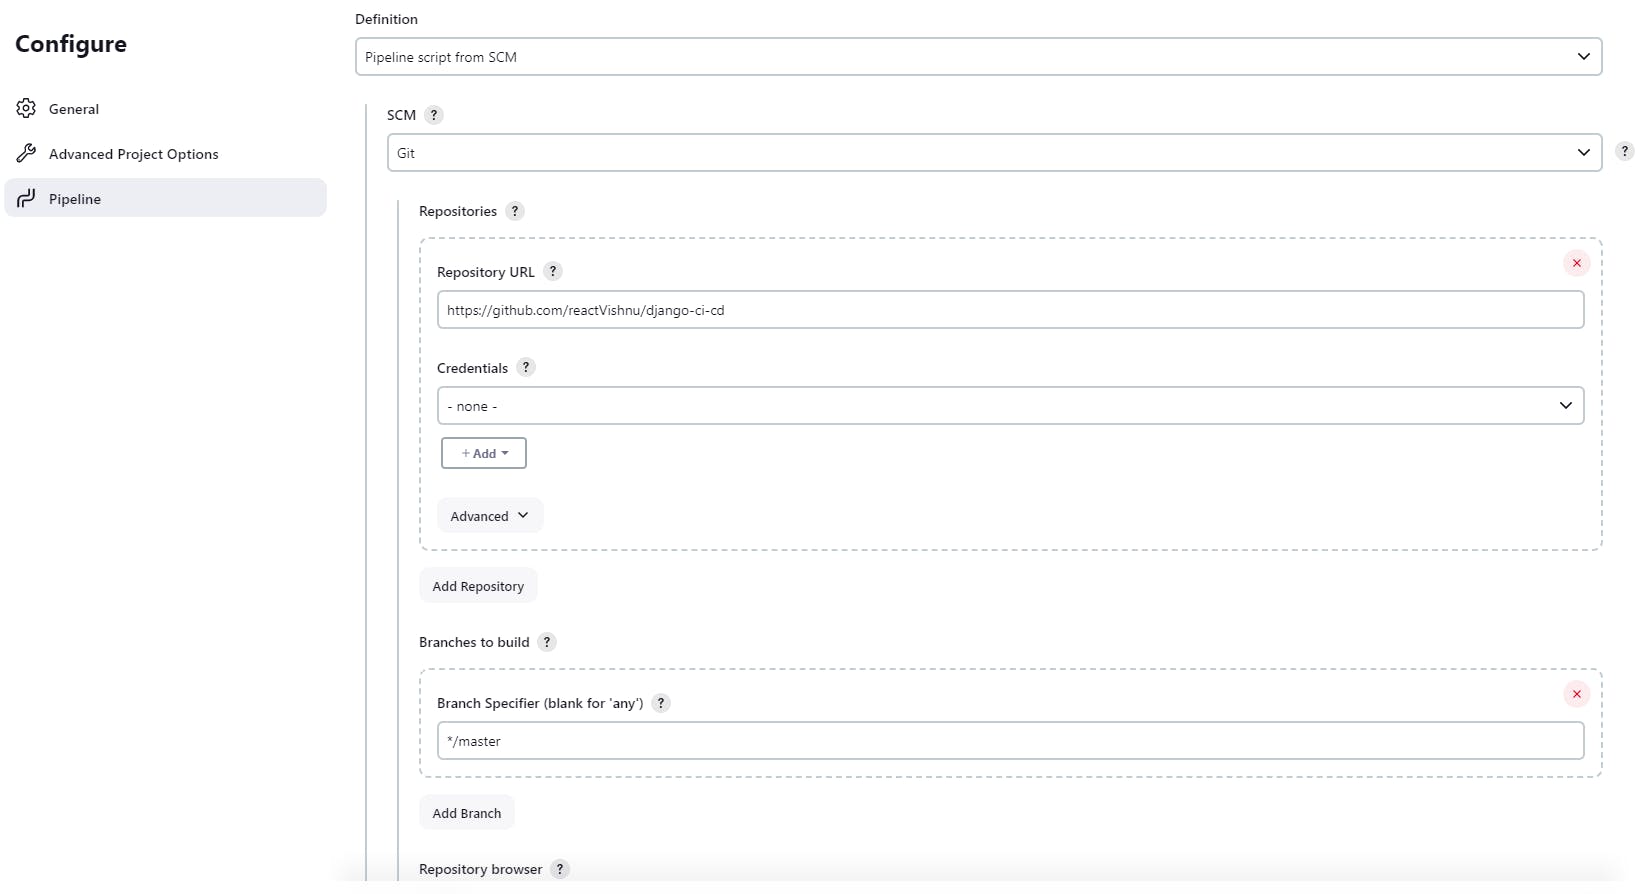
For credentials, create a personal access token and copy it.
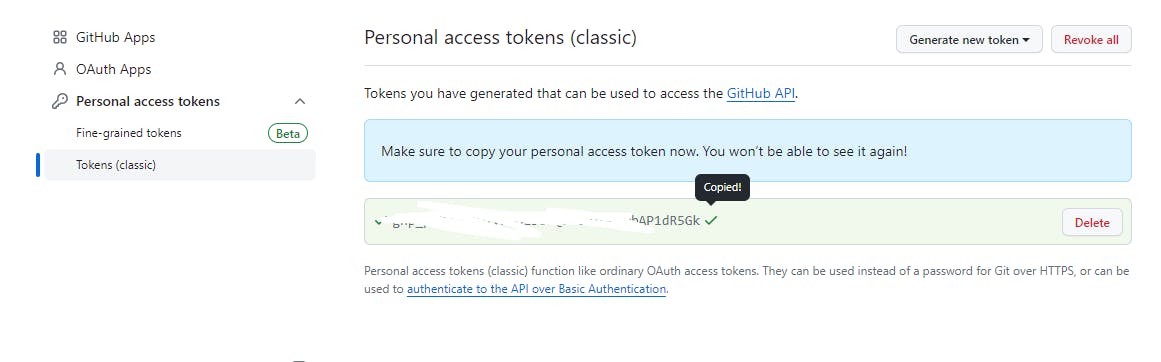
And Paste it like this in Jenkins.
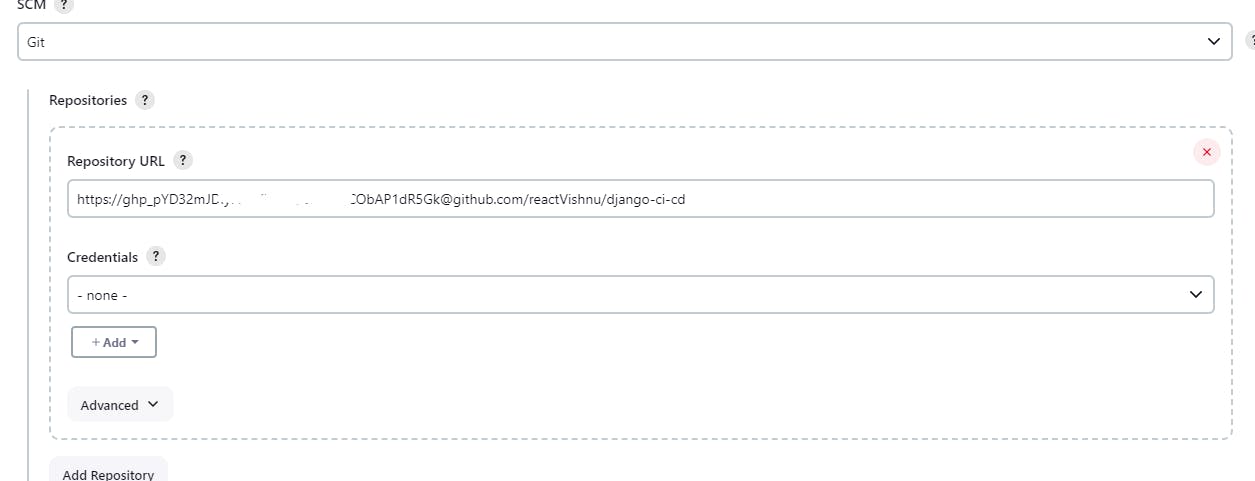
Provide the branch name and click on save.
Later, i will tell on how to setup for auto build trigger on code push.
Step 10: Giving access to Jenkin User
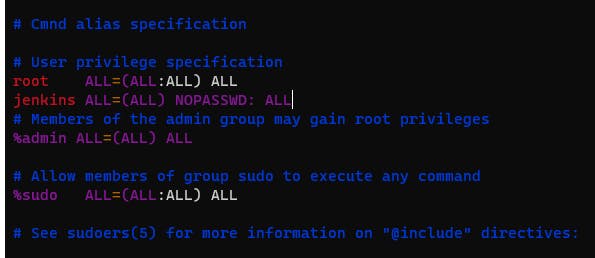
We used a lot of sudo in our scripts. And our user is Jenkins and it doesn't have sudo privilege to run those commands also we are not providing any password.
so let's add Jenkins to our sudoers list.
Run this command in your server.
sudo vi /etc/sudoersCopy this line
jenkins ALL=(ALL) NOPASSWD: ALLPaste like this and save it.
Step 11: Refactoring the code
Now, this is a crucial step for efficiently building a pipeline. If you have followed all the steps with me, I am confident that you may encounter errors when starting the build.
Let's address and fix some common issues:
File Path of Your Project: Ensure that the file paths in your scripts and configuration files accurately reflect the structure of your project. Copy the paths from the console output if needed, and update them in your scripts.
Minor Bugs during Installation or Virtual Environment Activation: Examine the console output for any errors during the installation or activation of the virtual environment. If you come across minor bugs, investigate the error messages, search for solutions online, and consider making manual installations if necessary.
Remove the default ngnix conf : It's possible that your Nginx is still utilizing the default settings, leading to the display of the default Nginx page in the browser.
Giving Permission to static folder: Sometimes, Nginx may lack permission to use the static folder, leading to broken pages without styles or images. Ensure the static folder has proper permissions for Nginx to access and serve its contents."
By addressing these issues, you'll enhance the robustness of your pipeline and increase the chances of a successful build.
File path of your project
In our project, there are approximately seven script files that use commands such as python manage.py makemigrations or migrate, requiring the correct file path for your project.
In the bonus tip section, I will provide instructions on how to set this up for an enterprise-level application.
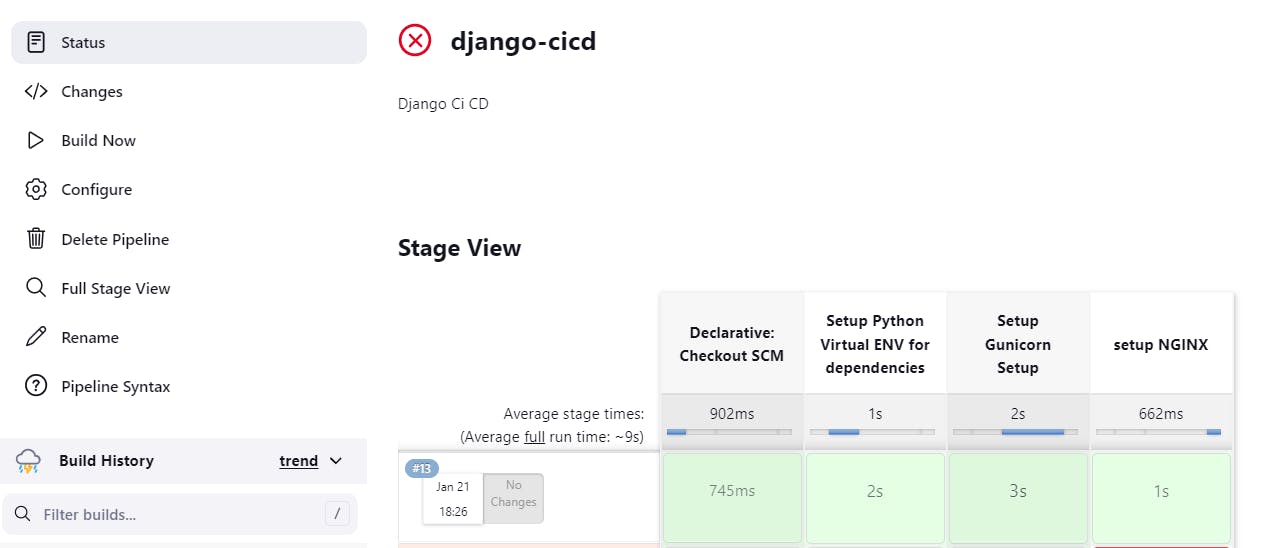
Now, run the build, examine the file path, and update it according to our project.

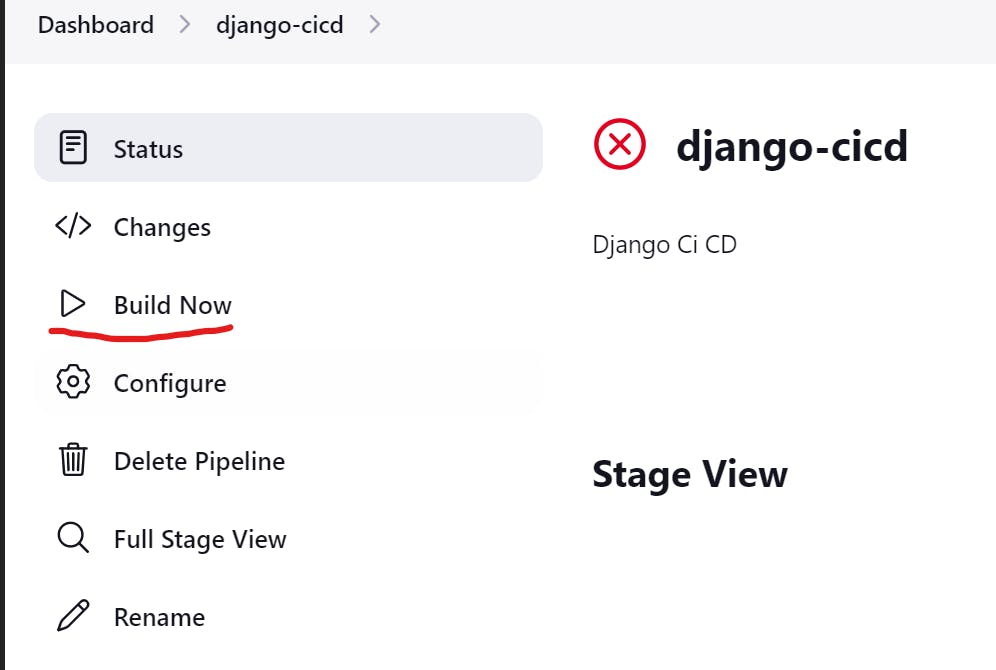
Now select the build no. and go to console output.
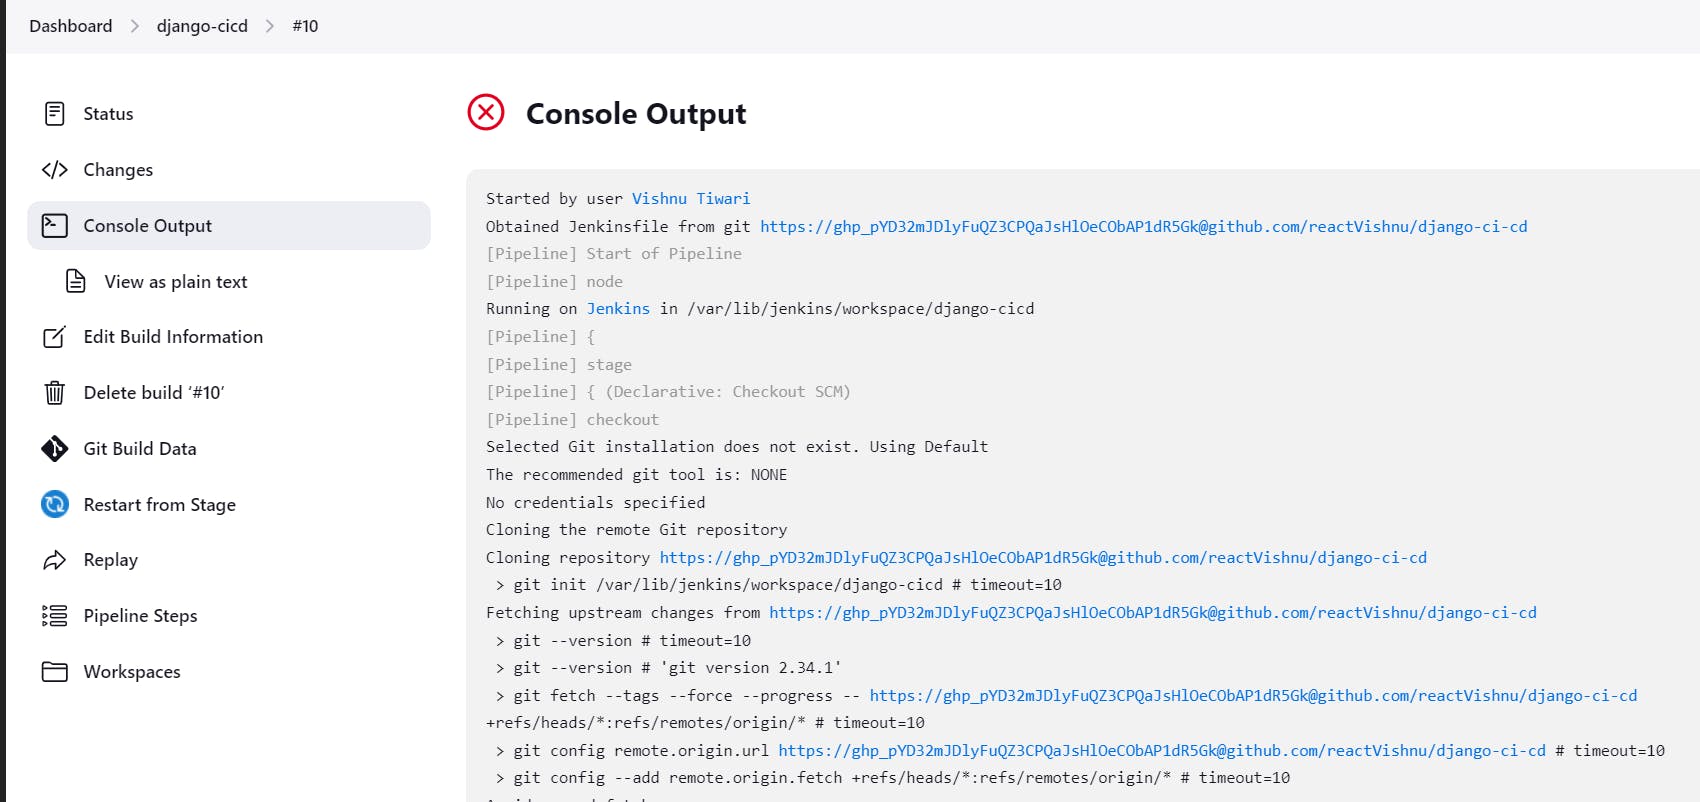

Copy the file path from the console output and examine it. You can navigate to this location to check for errors. Reference the path and update it in the scripts everywhere.
First, make changes in app.conf (two changes). Replace the file path with your project path.

Now in gunicorn.service file (2 changes)
in gunicorn.sh file (2 changes)
in ngnix.sh file (1 change)
After all these changes , your build should be successful.
Minor bugs during the installation or activating the virtual environment
If your build is not successful even after changing the file paths, examine the errors in the console output. Search the internet for solutions or consider installing the required tools manually.
If you encounter challenges activating the virtual environment, try doing it manually by navigating to the project location and creating a virtual environment from CLI.
Remove the default ngnix conf
Go to /etc/ngnix/sites-enabled/
Delete the default config.
rm -rf defaultNow go to /etc/ngnix/sites-available/
rm -rf defaultGreat ! We successfully deleted the default config and ngnix will use your app config.
Giving Permission to static folder
The www-data user is commonly used by Nginx to run its worker processes. These worker processes handle incoming HTTP requests, and Nginx uses this user for security reasons. It's a good practice to have the Nginx worker processes run with a less privileged user like www-data to limit potential security risks.
sudo chown -R :www-data /var/
By following all these steps and addressing potential issues, your build should be successful. If you encounter any further challenges or errors during the process, carefully review the console output, search for solutions, and consider adapting the instructions based on the specific requirements and configurations of your project. Remember to thoroughly test your pipeline to ensure its reliability and efficiency.
🎉 Congratulations! 🎉We have successfully setup the project.
Step 12: Accessing The Project on Browser.
Now, we need to ensure that our project is accessible on the internet. To achieve this, let's navigate to the AWS console. We'll need to allow traffic to view our application through HTTP or HTTPS, which typically uses ports 80 and 443. Let's proceed with the necessary configurations.
Go to security
Click on Security Groups
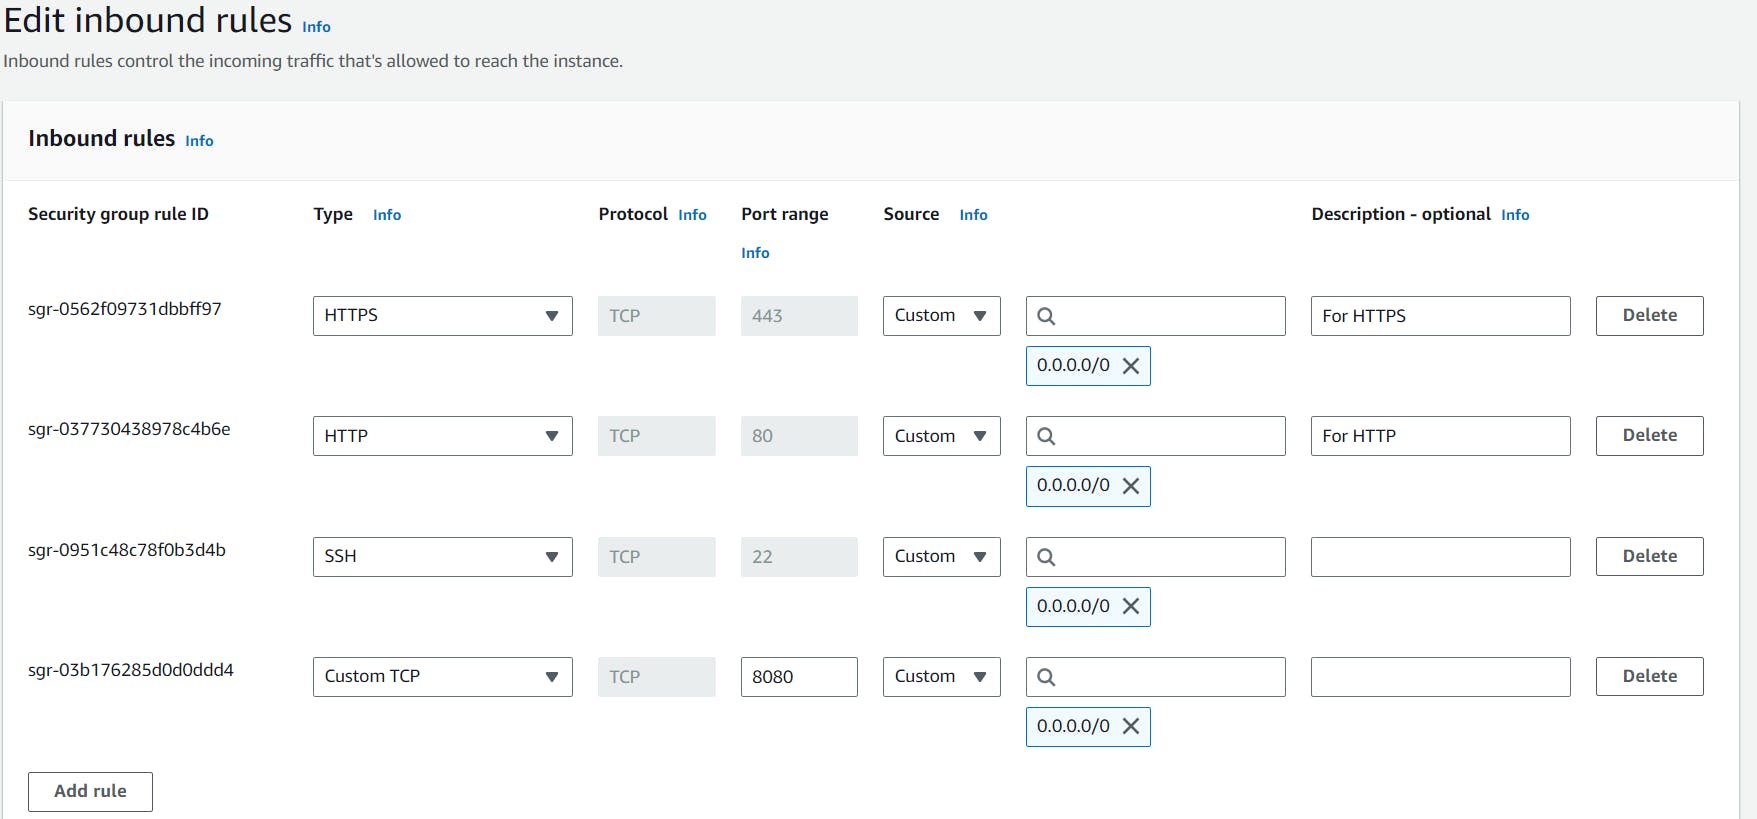
Edit the inbound rules

Add rules like this.
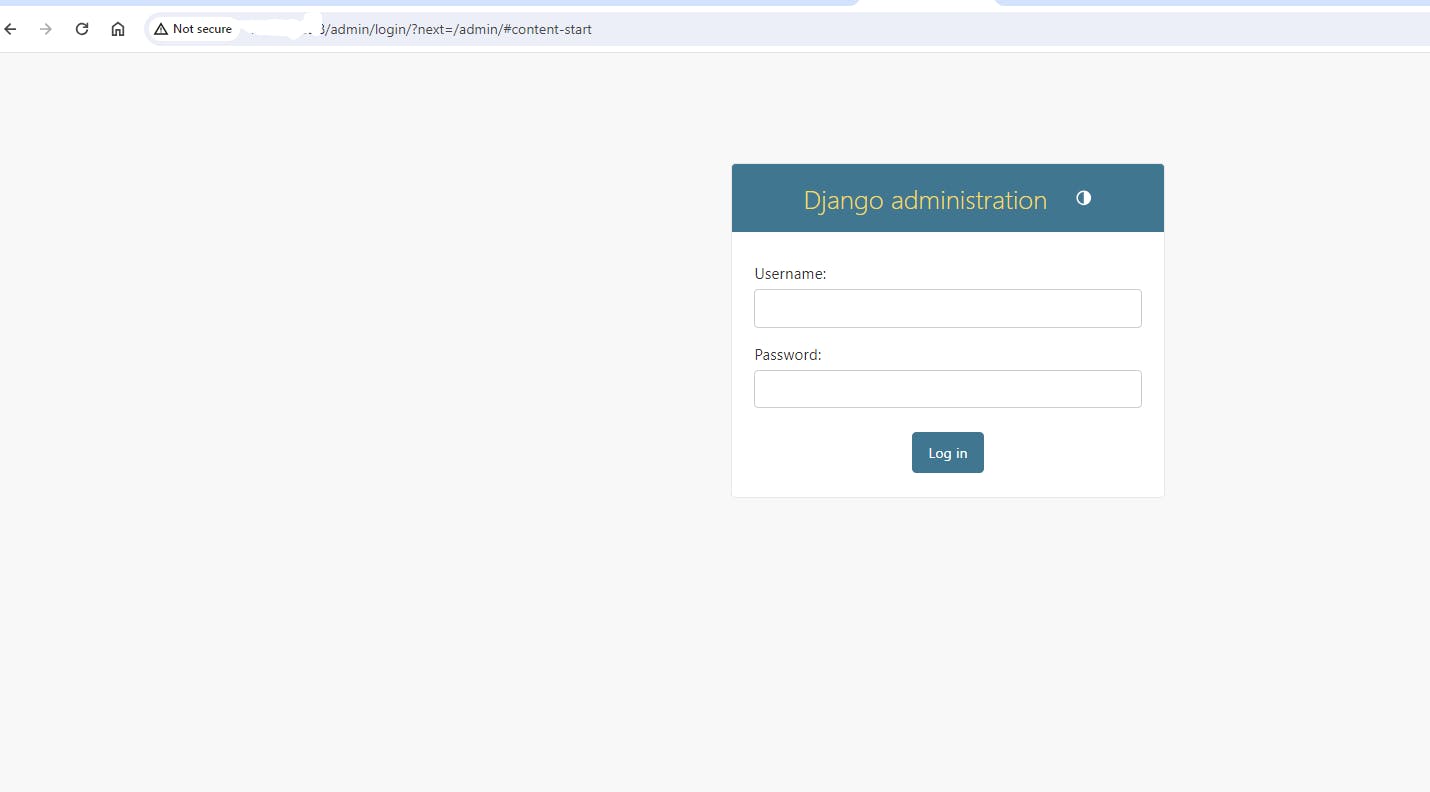
Now try to access your app through the browser like this
If you encounter any issues, double-check the security group rules, the status of your Django application, and any potential firewall settings. Additionally, ensure that your AWS EC2 instance has the necessary IAM roles and permissions for internet access.
🎉 Congratulations on successfully setting up your pipeline with Jenkins, Nginx, Gunicorn, and other components! Building and configuring a continuous integration and deployment (CI/CD) pipeline can be a complex task, so completing the setup is a significant achievement. 🚀💻
Bonus Tips
I'd like to share some bonus tips that I believe are crucial for setting up a pipeline in a corporate or tech giant environment. Having worked with esteemed companies such as IBM, Papa John's, and eBay, I feel qualified to offer insights based on the advice I received from my experienced colleagues.
Auto Build Trigger On Code Push
Automatic triggering ensures that builds are initiated immediately upon code push. This provides developers with rapid feedback on the impact of their changes, helping identify and address issues early in the development lifecycle.
- Go to Configure
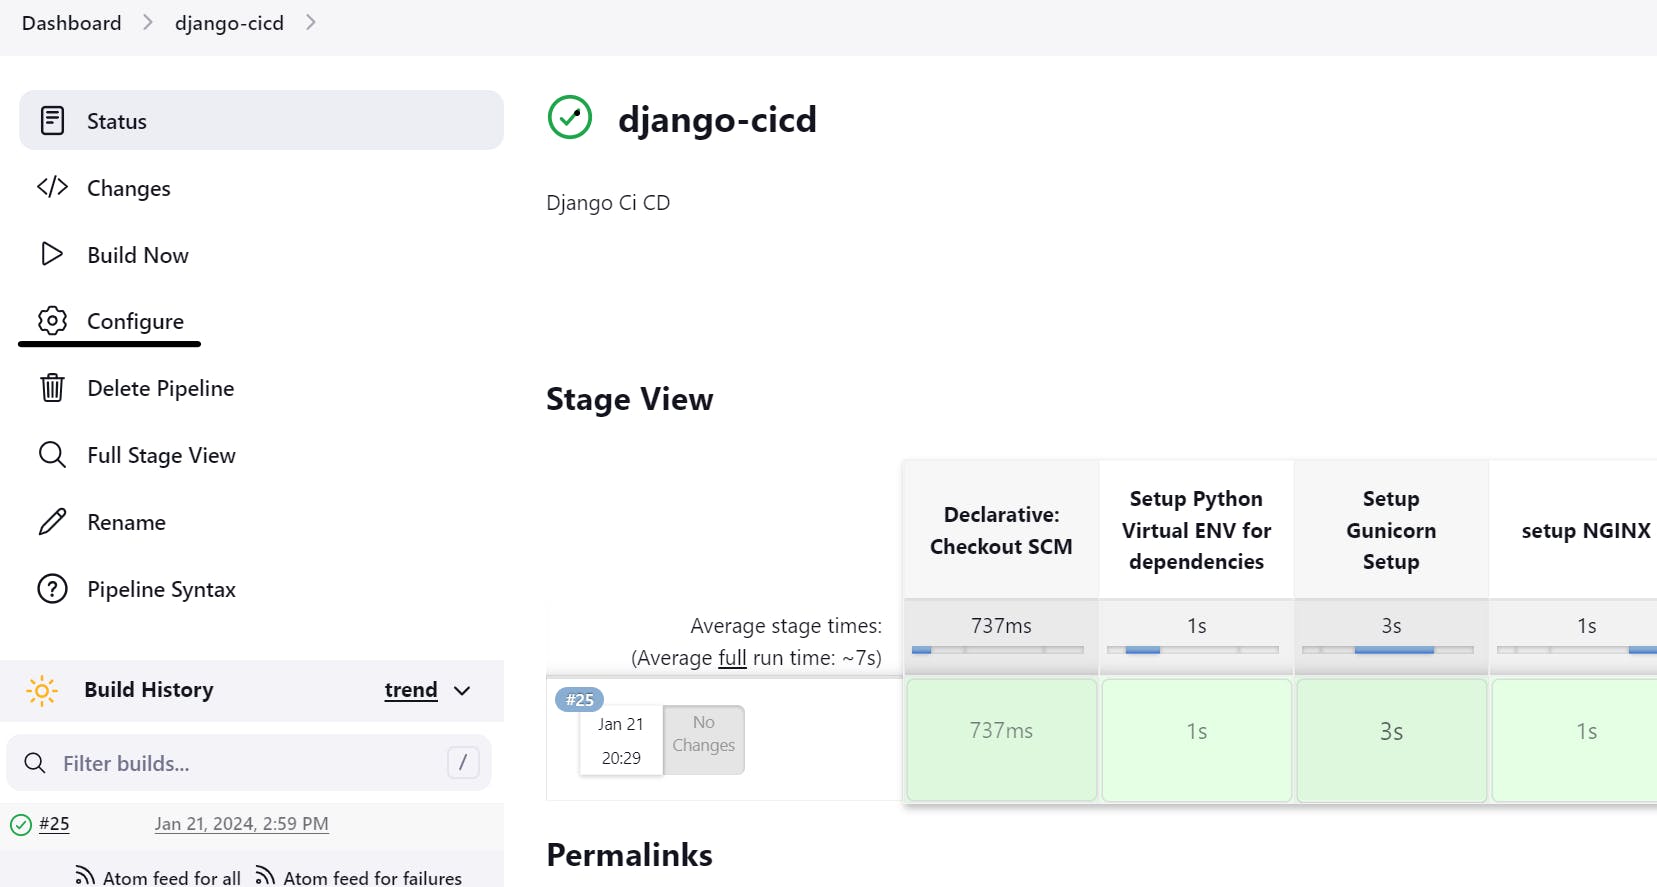
- Provide the GitHub Project URL
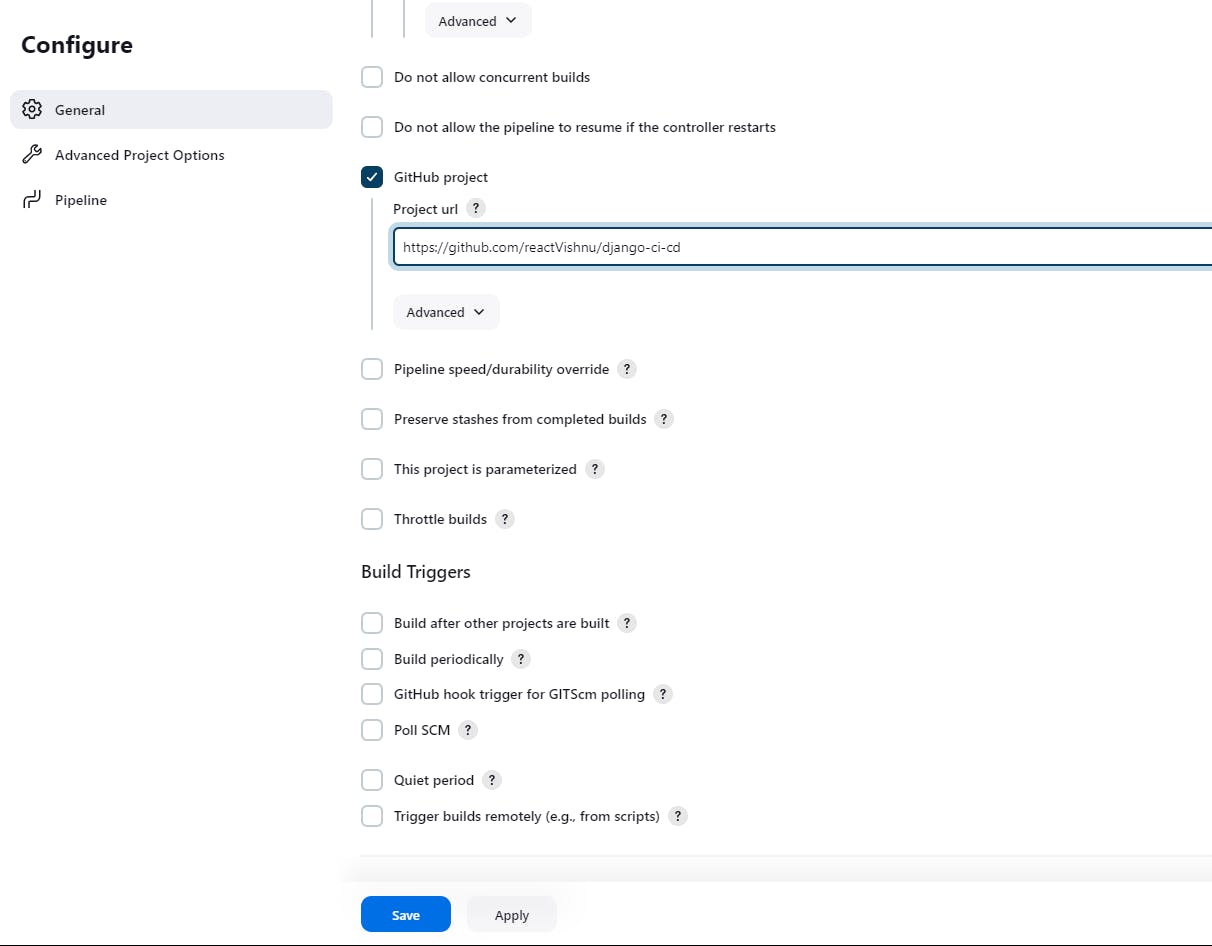
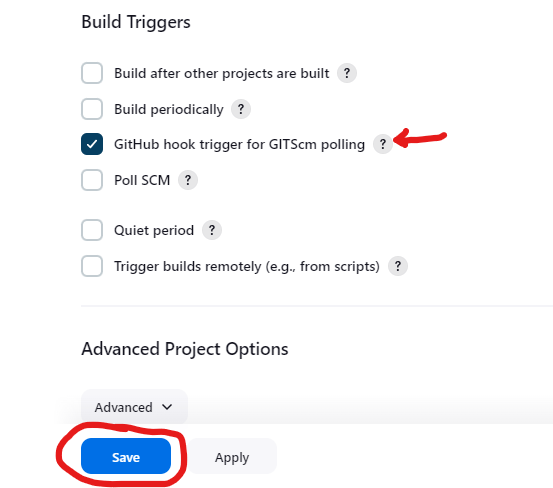
- Go to Build Trigger and Select GitHub hook trigger from GITScm Polling
Go to your project on GitHub > Settings > Webhooks
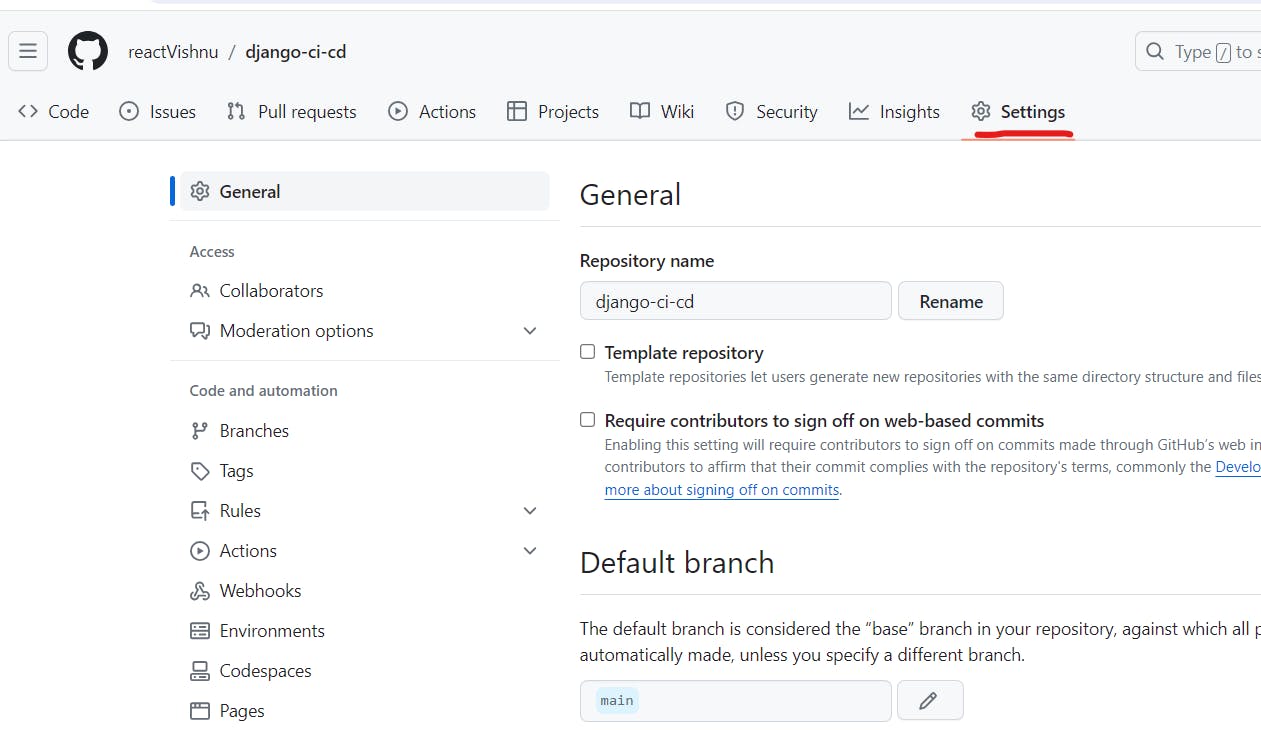
Add webhook
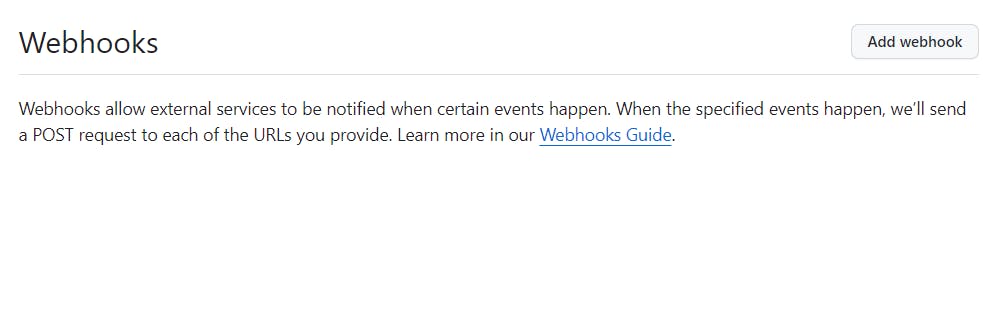
Fill the form like this, provide the server-url
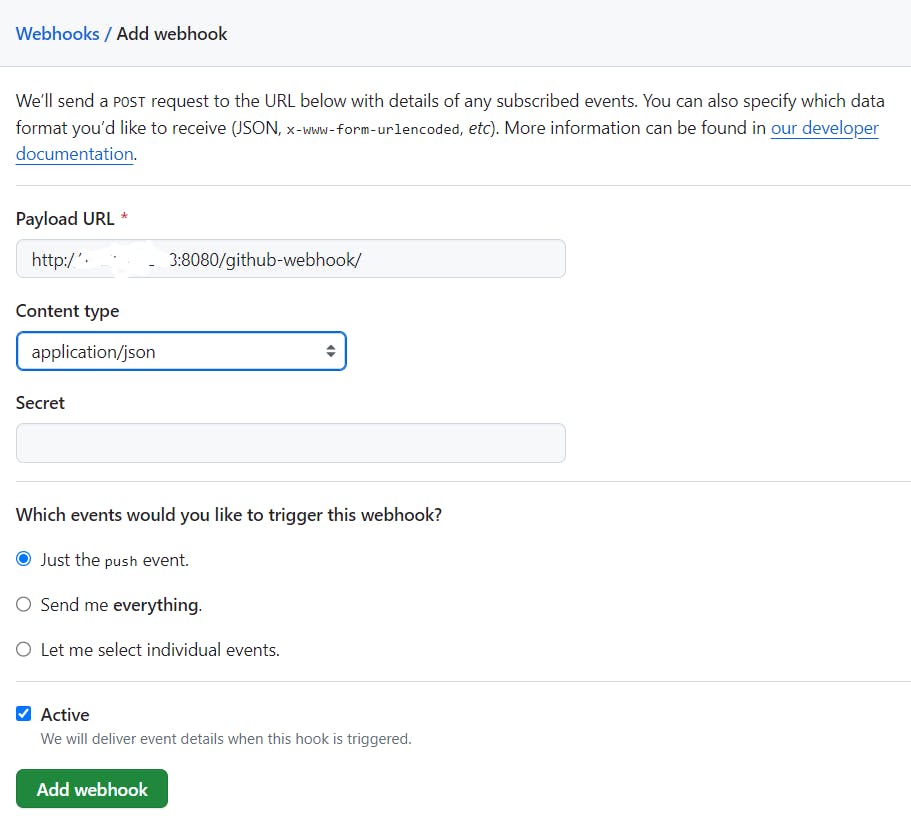
Click on Add webhook
Great! We have successfully setup the Auto Build Trigger
Use S3 Bucket for static file serving
Serving static files directly from S3 reduces the load on your Django server. Nginx can be configured to serve static files from S3, allowing the Django server to focus on processing dynamic requests.
When deploying updates to your Django project, you don't need to transfer static files to multiple servers. The static files hosted on S3 are accessible from any server, simplifying the deployment process.
When combined with Nginx, Amazon S3 provides a robust and scalable solution for handling static files and media in a Django project. It optimizes performance, simplifies deployment, and enhances the overall scalability of your application.Many corporations and large enterprises use Amazon S3 in conjunction with Django and Nginx, especially for handling static files and media storage in their web applications. Amazon S3 is a highly scalable, durable, and cost-effective object storage service provided by Amazon Web Services (AWS). Its features and benefits make it an attractive choice for various use cases, including those in corporate environments.
I'm planning to craft a dedicated article on seamlessly integrating Amazon S3 with a Django project. Writing the details here might unintentionally extend this conversation.
Optimizing Jenkins Security: Preventing Builds on the Built-In Node
Avoid executing any builds on the default built-in node by taking the following steps: Navigate to Manage Jenkins > Manage Nodes and Clouds, choose Built-In Node from the list, select Configure from the menu, set the number of executors to 0, and save the configuration. Ensure that you establish clouds or build agents for executing builds; otherwise, build initiation will not be possible.Why is this a crucial practice? By default, Jenkins is configured to execute builds on the built-in node for the sake of simplicity during initial setup. However, this approach is not recommended for the long term. Running builds on the built-in node grants them the same level of access to the controller file system as the Jenkins process. To mitigate security risks, it is highly recommended to abstain from running any builds on the built-in node and, instead, utilize agents (either statically configured or provided by clouds) to carry out builds.
Remove unnecessary permissions:
Eliminate redundant permissions for the 'authenticated users' group by navigating to Manage Jenkins > Configure Global Security > Authorization > Authenticated users. It is crucial to follow this step because, in alignment with the preceding section, even when employing a Matrix-based authorization method, it is imperative to prevent the default 'authenticated users' group from possessing unnecessary permissions. Whenever feasible, revoke any excessive permissions assigned to this default group and allocate permissions specifically to the groups or users that you have defined."Dockerize the Django Project
Docker eliminates the "it works on my machine" problem by packaging your application and its dependencies into a single container. This reduces the likelihood of issues arising from differences in development and production environments.
Use a Docker image with Python and install necessary dependencies for your Django application. Run Gunicorn as the application server inside the Docker container to serve your Django app.
Set up a separate Docker container with Nginx as the reverse proxy. Configure Nginx to forward requests to the Gunicorn server. This separation allows Nginx to handle static file serving efficiently.
By dockerizing your Django project and integrating it with Nginx, Gunicorn, and Jenkins, you establish a reliable and portable infrastructure that fosters consistency, scalability, and efficient collaboration throughout the development and deployment lifecycle.
Add the test - Continuous Integration
Every project has some test suite to test the application, the build should be successful, only if all the tests are passing, so you can run the test suite and add it as a stage in Jenkins.
python3 manage.py testCreate a File like testrunner.sh
 #!/bin/bash

 cd /var/lib/jenkins/workspace/django-cicd/

 source env/bin/activate

 cd your_project/
 python3 manage.py test
Add it in the pipeline.
 pipeline {
     agent any
     stages {
         stage('Setup Python Virtual ENV for dependencies') {
             steps {
                 sh '''
                 chmod +x envsetup.sh
                 ./envsetup.sh
                 '''
             }
         }
         stage('Test Suite') {
             steps {
                 sh '''
                 chmod +x testrunner.sh
                 ./testrunner.sh
                 '''
             }
         }
         stage('Setup Gunicorn Setup') {
             steps {
                 sh '''
                 chmod +x gunicorn.sh
                 ./gunicorn.sh
                 '''
             }
         }
         stage('Setup NGINX') {
             steps {
                 sh '''
                 chmod +x nginx.sh
                 ./nginx.sh
                 '''
             }
         }
     }
 }
This Jenkins pipeline script has successfully outlined a streamlined workflow for your Django project. We started by setting up a Python virtual environment for dependencies, ran a comprehensive test suite to ensure code integrity, and seamlessly integrated Gunicorn and NGINX for production-ready deployment. Embracing Continuous Integration (CI) principles, the script automates the testing phase, ensuring that code changes are validated consistently. Additionally, when combined with other stages, it lays the foundation for a powerful Continuous Deployment (CD) pipeline, automating the delivery process up to the production environment. By implementing this Jenkins pipeline, you're not just coding; you're orchestrating a robust and efficient development lifecycle.
Conclusion
In this guide, we've unlocked the power of Jenkins CI/CD for Django, seamlessly orchestrating builds, tests, and deployments on an EC2 instance. 🛠️ With Nginx as our reverse proxy and Gunicorn as the WSGI server, our Django projects now thrive in a secure and high-performance environment.
As you wrap up this journey, remember: Continuous improvement is the heartbeat of effective development. 🔄 Keep iterating, refining, and adapting your CI/CD pipeline to fuel the evolution of your Django projects.
Cheers to streamlined development, collaborative coding, and the endless possibilities that Jenkins unfolds! 🎉 Happy coding, and may your Django endeavors soar to new heights! 🚀